Тест камеры Panasonic Lumix DMC-LX3
About downloading service
| STEP 2. Download the updated version of the firmware with the following procedures, and self-extract it. | |||||||||||
|
|||||||||||
| STEP 3. Copy the firmware file onto an SD Memory Card. Prepare an SD Memory Card with the extracted file from STEP 2 above. | |||||||||||
|
Preparation of the SD Memory Card 8 MB or more must be free on the SD Memory Card and use an SD Memory Card which has already been formatted for the DMC-LX3. Please refer your instruction book for mode details. (Use DMC-LX3 for formatting the SD Memory Card.) |
|||||||||||
| STEP 4. Install the firmware update | |||||||||||
Insert the SD Memory Card prepared in STEP 3 into the DMC-LX3.
If newer version or same version of firmware has already been installed, the initial setup screen(Fig. 3) will not be displayed. And the DMC-LX3 will display that «NO VALID PICTURE TO PLAY». Please turn off your camera and use the camera as is. About SD Memory Card, please refer to the Note below. Press the Up button to select YES. The update process will start (Fig. 4 and Fig. 5). At the above screen(Fig.4), press the MENU/SET button(Fig.5) and the screen will change to Fig. 6.
Once the firmware update process is completed, the DMC-LX3 will turn off the power and turn on again then the camera will be reset to initial mode automatically. Note: |

Introduction
The Lumix DMC-LX3 is the third compact digital
camera from Panasonic to offer a 16:9 ratio image, following on from
the original LX1 model that was released back in 2005 and the LX2 in 2006. The Panasonic LX3 additionally offers
more conventional 3:2 and 4:3 ratio images via a switch on
the lens barrel. Other improvements on the
Panasonic DMC-LX3 include a brand new 10 megapixel, 1/1.63-inch CCD sensor, Venus
Engine IV image processor, 3.0-inch LCD screen with a 3:2 aspect ratio and 460K dot resolution, and extended ISO range (80-3200). The
Panasonic LX3 also has a wealth of options that will appeal
to the more serious photographer. It features a 2.5x, 24-60mm wide-angle lens with a bright maximum aperture of F/2.0 at the 24mm setting, optical image stabilizer,
full range of manual exposure controls, compact all-metal
body, 2.5fps continuous shooting and support for both JPEG and RAW image formats.
Panasonic have certainly made some bold claims about the LX3, stating that it offers «the highest image quality in compact camera history». And with a hefty price-tag of Ј399 / $499.95, you’d expect the LX3 to be near the mark. So does the Panasonic Lumix DMC-LX3 significantly improve
on the popular LX2 model, and is it the right compact digicam
for you? Carry on reading the World’s first online review to find out…
Intro
The Lumix DMC-LX3 is Panasonic’s flagship compact for enthusiasts. Announced in July 2008, two years after its predecessor, the new LX3 features 10.1 Megapixel resolution, full manual control, HD movie recording, a flash hotshoe, RAW recording and a 2.5x optical zoom with optical stabilisation, a bright focal ratio and an unusually wide angle lens.
The new Lumix LX3 may physically resemble its predecessor from the outside and indeed shares most of the same controls, but under the hood, almost everything is different. The total pixel count may remain essentially the same, but it’s out with the old 16:9 widescreen sensor and in with a newly designed CCD with a more conventional 4:3 aspect ratio, but which maintains its angle of view at multiple aspect ratios – see our Features page for a full explanation. Crucially, Panasonic claims this new sensor is 19% more sensitive than the LX2, which should hopefully address concerns over noise on this earlier model.
|
The earlier LX2 already sported a wide angle lens with coverage equivalent to 28mm, but the new LX3 trumps this – and most compacts – with impressively wide 24mm coverage. Panasonic has also designed the lens to have a bright focal ratio of f2.0-2.8, which is at least a stop brighter than most other compacts, allowing it to typically gather double the light, which in turn means quicker exposures or less reliance on higher sensitivities. Like all Panasonic compacts, the LX3’s lens also features Optical Image Stabilisation to help combat camera-shake. So while the LX3’s new lens has a shorter range than its 4x predecessor, many will prefer the wider coverage and brighter aperture here.
The LX3’s screen is now larger and more detailed at 3in with 460k pixels, but the shape is now 3:2 to the LX2’s 16:9. Unlike its predecessor though, clever use of the sensor area allows the LX3 to maintain its angle of view at any of its three aspect ratios, so there’s no coverage compromise whether shooting 4:3, 3:3 or 16:9, and only a small drop in resolution at the wider aspects.
Like its predecessor, the Lumix LX3 features an impressive array of manual controls, giving you complete control over the aperture, shutter and focus. There’s also still the facility to record in the RAW format, and recognising many potential customers were won over by some aspects of the Canon G9, Panasonic has additionally equipped the LX3 with a flash hotshoe and an optional clip-on viewfinder.
Completing the package are a number of technologies from Panasonic’s latest Lumix compacts – so the LX3 enjoys HD movie recording in the 720p format, optional component video output to HDTVs, and Panasonic’s Intelligent Auto mode which has an uncanny ability of figuring out what kind of photo you’re trying to take.
Overall it’s a compelling specification for enthusiasts or anyone wanting a compact to complement a DSLR, but of course the big question is how it all works in practice. Does the LX3 really give you full control over your creative desires and crucially is the image quality a step-up from the disappointing output of the earlier LX2? Find out in our full review where we’ll examine the LX3’s new features, test its performance in practice and see how the image quality measures-up to key rivals including the popular Canon PowerShot G9. And as always, for a demonstration of its key features, check out our Panasonic Lumix DMC-LX3 video tour.
Testing notes: we tested a final production Lumix LX3 running firmware version 1.0. Unless otherwise stated, the LX3 was set to Program mode with Auto White Balance and its Standard Film mode. Optical Image Stabilisation was enabled for all handheld images and disabled for tripod-based tests.
Continue: Panasonic Lumix DMC-LX3 design and controls
About downloading service
Dear Customers,
We would like to thank you for purchasing Panasonic DMC-LX3.
From this site, you’ll be able to easily download the latest firmware to enhance the product’s performance.
Update Contents
| Model Number | DMC-LX3 |
| Update Version | Ver 2.2 |
| Update File Name/ Size |
For Windows: For Macintosh: |
| Update Date | 2010/7/29 |
Improvements
| Date/Version | Description |
| 2010/7/29 Ver 2.2 |
|
| 2009/10/21 Ver 2.1 |
|
| 2009/9/28 Ver 2.0 |
Concerning the DMC-LX3 Firmware UpdatePHOTOfunSTUDIO 2.1 Update Program |
| 2009/6/1 Ver 1.3 |
|
| 2009/1/15 Ver 1.2 |
|
| 2008/12/15 Ver 1.1 |
|
Firmware Update Procedures (Overview)
- STEP 1. Check the current version of firmware used by your camera.
- STEP 2. Download an updated version of the firmware and double click the downloaded file to decompress it.
- STEP 3. Copy the firmware file onto an SD Memory Card.
- STEP 4. Install the firmware update.
Caution:
|
Actual installation steps
| STEP 1: Reading the current firmware version. | |||
| Panasonic recommends that you update the firmware in your camera if either of the following conditions exists: | |||
| If the firmware version indicated is older than the version being offered, please update firmware. The firmware update is not necessary if the current firmware version on your camera is Version 2.1. |
|||
|
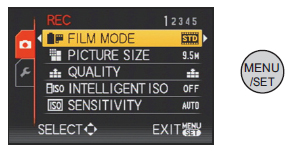
1.Turn the camera on.
2.Slide the / selector switch to [] 3.Set the mode dial to [] |
|||
|
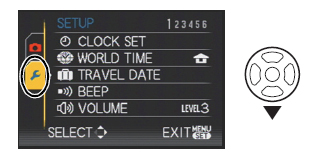
4.Press [MENU/SET] to display the menu. You can switch menu screens from any menu item by rotating the zoom lever. |
 |
||
 |
|||
|
License Agreement Download of any file for Panasonic firmware update requires your agreement with the software agreement. You may proceed to the next step only once you have agreed. Please make sure to confirm all terms and conditions in advance to proceed to download. |
|||
|