Групповой тест Canon S95, Panasonic DMC-LX5, Nikon P7000 — Panasonic LX5КорпусДизайн и управлениеВ рукахЭлементы корпуса
Содержание
Introduction
The Panasonic Lumix DMC-LX5 is the much-anticipated successor to the LX3, a compact digital camera that proved especially popular with experienced photographers due to its fast lens, full range of manual shooting modes and RAW file support. The new LX5 aims to build on the success of its predecessor with a new 3.8x, 24-90mm zoom lens, large 1/1.63-inch 10 megapixel CCD sensor and HD movie recording with Creative Movie Mode for adjusting both the shutter speed and aperture. Other key improvements to the LX5 include a re-designed user interface, Power OIS anti-shake system, Intelligent Resolution technology and an optional electronic viewfinder. The Panasonic Lumix DMC-LX5 is available now in black or white for £449.99 / $499.95.
Комплект поставки и опции
Стандартный комплект поставки включает:
- Зарядное устройство;
- Аккумулятор;
- Футляр для аккумулятора;
- Ремень;
- CD-ROM с ПО;
- AV-кабель;
- USB-кабель;
- Крышку для объектива;
- Шнурок для крышки;
- Крышку «горячего башмака».
Перечень опциональных аксессуаров довольно обширный: видоискатель Live View DMW-LVF1, внешний оптический видоискатель DMW-VF1, широкоугольный конвертор DMW-LWA52, адаптер DMW-LA6, защитный фильтр DMW-MC52, нейтральный фильтр DMW-LND52, поляризационный фильтр DMW-LPL52, внешние вспышки DMW-FL220(GN22) / DMW-FL360(GN36) / DMW-FL500(GN50), кожаный чехол DMW-CLX5.
About downloading service
Dear Customers,
We would like to thank you for purchasing Panasonic DMC-LX5.
From this site, you’ll be able to easily download the latest firmware to enhance the product’s performance.
Update Contents
| Model Number | DMC-LX5 |
| Update Version | Ver 2.0 |
| Update File Name/ Size |
For Windows: For Macintosh: |
| Update Date | 2011/09/13 |
Improvements
| Date/Version | Description |
| 2011/09/13 Ver 2.0 |
About the Upgrade of the DMC-LX5 FirmwarePHOTOfunSTUDIO 5.0 HD Edition Update Program |
Firmware Update Procedures (Overview)
- STEP 1. Check the current version of firmware used by your camera.
- STEP 2. Download an updated version of the firmware and double click the downloaded file to decompress it.
- STEP 3. Copy the firmware file onto an SD Memory Card.
- STEP 4. Install the firmware update.
Caution:
|
Actual installation steps
| STEP 1: Reading the current firmware version. | |||
| Panasonic recommends that you update the firmware in your camera if either of the following conditions exists: | |||
| If the firmware version indicated is older than the version being offered, please update firmware. The firmware update is not necessary if the current firmware version on your camera is Version 2.0. |
|||
|
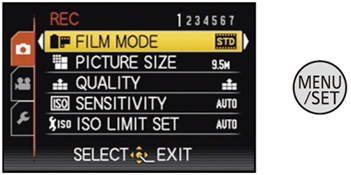
1.Turn the camera on. (A) [MENU/SET] button 2.Set the mode dial to [] |
 |
||
|
3.Press [MENU/SET] to display the menu. You can switch menu screens from any menu item by rotating the zoom lever. |
 |
||
|
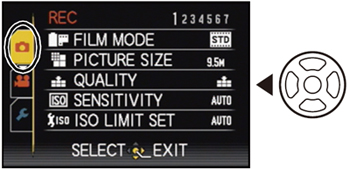
4.Press [] . |
 |
||
|
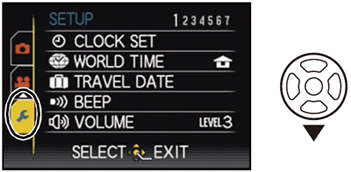
5.Press [] to select the menu |
 |
||
| 6.Press []. | 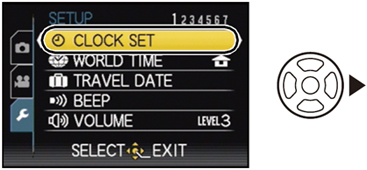 |
||
|
License Agreement Download of any file for Panasonic firmware update requires your agreement with the software agreement. You may proceed to the next step only once you have agreed. Please make sure to confirm all terms and conditions in advance to proceed to download. |
|||
|
Panasonic DMC-LX5 Firmware Downloads
Operating System(s):Windows 8 and 8.1, Windows 7, Windows Vista, Windows Xp
Panasonic DMC-LX5 Firmware – Download (15.6MB)
Panasonic DMC-LX5 Installation instructions for Windows Users:
- Make a temporary folder on your PC for downloading the file,e.g. C:/Temp.
- Download and save the firmware in the folder you created in the above step.
- Double click the downloaded file.You may see screen after you have double clicked the downloaded file, please click “Run” button and move to the next step.
- The self-extracted file LX5__V20.bin will appear.The file size for LX5__V20.bin should be 15,6 Megabytes.If the file size is not the same, please download and double click the file again. The file size can be checked by right-clicking on the file and selecting properties.
Panasonic DMC-LX5 Firmware Update Procedure:
- Check the current version of firmware used by your camera.
- Download an updated version of the firmware and double click the downloaded file to decompress it.
- Copy the firmware file onto an SD Memory Card.
- Install the firmware update.
Operating System(s):Mac OS X
Panasonic DMC-LX5 Mac Firmware – Download (15.5MB)
Panasonic DMC-LX5 Installation instructions for Macintosh Users:
- Make a temporary folder on your Mac for downloading the file.
- Download and save the firmware in the folder you made in the above step.
- Extract downloaded file; Depending on your Macintosh setting the file maybe automatically extracted.If your OS is earlier than Mac OS X 10.3, please use Extract software. If your Macintosh OS is equal or later than Mac OS X 10.3, double click the file, LX5__V20.zip.
- The extracted file LX5__V20.bin should be 15, 5 Megabytes if the file size is not the same, please download and double click the file again. To check the file size, view “File in Finder” then check the information window.
- DMC-LX5 Manual and Installation detail
Description for Panasonic DMC-LX5 Firmware version 2.0:
- Auto Focus speed-up.
- has been added to the menu.
- Improved auto white balance performance.
- has been added to the menu.
- The AF/AE Lock operated by half-pressing the shutter button has been improved.
- When is set, you can make fine adjustments to the focus using a simpler operation than before.
- The position and size of the AF area you have set are now stored.
- The upper limit of the shutter speed in Manual Exposure Mode has been raised.(Max 250 seconds approximately).
- has been added to My Colour Mode.
- / has been added to the menu.
Технические характеристики, заявленные производителем
| Panasonic LUMIX DMC-LX5 | |
|---|---|
| Сенсор изображения | ПЗС, 1/1,63” |
| Эффективное количество точек | 10,1 Мп |
| Формат сохранения изображения | Фотокадр: JPEG (EXIF 2.21, DCF), RAW Видео: AVCHD, MoutionJPEG |
| Размер кадра в пикселях | Фотокадр 4:3 3648х2736 (10М) 3072х2374 (7М), 2560х1920(5M), 2048х1536(3M) 1600х1200(2M), 640х480(0.3M) 3:2 3776х2520 (9,5M), 3168х2112 (6,5M), 2656х1768 (4,5M), 2112х1408 (3M), 2048х1360 (2,5M), 640х424 (0,3M) 16:9 3968х2232 (9M), 3328х1872 (6M), 2784х1568 (4,5M), 2208х1248 (2,5M), 1920х1080 (2M), 640х360 (0,2M) 1:1 2736х2736(7,5M), 2304х2304 (5,5M), 1920х1920 (3,5M), 1536х1536 (2,5M), 480х480 (0,2M)Видео: 4:3 VGA: 640х480 пикселей, 30 кадров в сек. (Motion JPEG) QVGA: 320 х 240 пикселей, 30 кадров в сек. (Motion JPEG) 16:9 720p: 1280×720 50i (AVCHD Lite); WVGA: 848х480 пикселей, 30 кадров в сек. (Motion JPEG) |
| DPOF | Поддержка DPOF |
| Чувствительность, единиц в ISO-эквиваленте | Auto, i.ISO, 80, 100, 200, 400, 800, 1600, 3200, 6400*, 12800* (*изменение масштаба изображения) Высокая чувствительность (ISO 1600-12800) |
| Конструкция объектива | LEICA DC VARIO-SUMMICRON 10 элементов, собранных в 9 групп, включая 3 асферические линзы с 5 асферическими поверхностями |
| Диапазон фокусных расстояний, мм | 5,1–19,2 (24–90 в 35-мм эквиваленте) (25–95 мм в 35-мм эквиваленте при съемке видео) |
| Диафрагма | f/2,0–f/3,3 |
| Цифровое увеличение | до 1,3х |
| Минимальная дистанция фокусировки, см | 50 (1 в макрорежиме) |
| Диапазон выдержек, с | 1/4000-60 |
| Экспозамер | Многозонный, центрально взвешенный, точечный |
| Экспокоррекция | +/-3 EV с шагом 1/3 EV |
| Режимы сюжетных программ | 23 сюжетные программы, автоматическое распознавание |
| Баланс белого | Авто, Дневной свет, Облачно, Тень, Галоген, Установка белого, выбор цветовой температуры |
| Встроенная вспышка | Есть |
| Режимы вспышки | Авто, коррекция эффекта «красных глаз», медленная синхронизация, принудительное вкл./выкл. |
| Диапазон действия вспышки (чувствительность Авто), м | До 7,2 |
| Автоспуск | С задержкой 2/10 с |
| Устройство хранения информации | SD, SDHC, SDXC |
| Встроенная память, Мбайт | 45 |
| ЖК-дисплей | 3,0” цветной ЖК-дисплей, 460 тыс. точек |
| Интерфейс | miniHDMI, microUSB 2.0 |
| Питание | Литий-ионный аккумулятор DMW-BCG13E (в комплекте), 4,5 Вт*ч |
| Габариты (Ш х В х Д), мм | 109,7 x 65,5 x 43,0 |
| Масса (без учёта аксессуаров), г | 271 |
| Цена, руб. | Нет данных |
Дисплей и интерфейс
В камере установлен большой 3-дюймовый дисплей со средним по современным меркам разрешением в 460 тыс. точек. Углы обзора достаточно велики, что позволяет комфортно оценивать изображение при взгляде под очень острым углом, например, на вытянутых вверх руках. Неплоха и цветопередача, но вот оценивать корректность экспозиции по экрану довольно сложно — результаты на дисплее камеры и мониторе ПК совершенно разные. Также из недостатков стоит отметить довольно тонкую защиту дисплея, которая достает до ЖК-матрицы даже при достаточно лёгком давлении, причём не только в центральной, но и в любой другой части дисплея. Интерфейс камер Panasonic один из самых продуманных и удачных, причём это касается всех камер, начиная от недорогих компактов и заканчивая аппаратами со сменной оптикой. Один из важнейших элементов интерфейса камер Panasonic – это быстрое меню, наиболее продуманное по сравнению с аналогами остальных производителей. Вот только в быстром меню тестируемой камеры есть один недочёт – в нём не предусмотрена возможность выбора чувствительности. Но ничего страшного в этом нет, ведь для вызова меню выбора светочувствительности можно воспользоваться клавишей . В остальном к интерфейсу даже придраться трудно.
|
Главное окно режима фотосъёмки |
Выбор режима съёмки |
|
Выбор режима работы вспышки |
Активирование серийной съёмки |
|
Выбор режима экспозамера |
Установка режима выбора зоны фокусировки |
|
Выбор настройки баланса белого |
Выбор разрешения снимка |
|
Выбор разрешения видео |
Установка яркости дисплея |
|
Настройка параметров фотосъёмки |
|
|
Просмотр снимка, базовых метаданных и гистограммы |
|
|
Полноэкранный просмотр снимка |
|
|
Просмотр снимка и базовых данных файла |
Просмотр максимально увеличенного фрагмента |
|
Матрица миниатюр 4х3 |
Матрица миниатюр 6х5 |
|
Календарь съёмок |
Настройка параметров просмотра |
|
Системные настройки |
|
|
Настройка системных параметров |
|
Внешний вид и удобство использования
Вид общий
Формально камера Panasonic LUMIX DMC-LX5 является конкурентом таких камер, как Canon PowerShot G12 и Nikon Coolpix P7000. Вот только общего в дизайне у них мало. Тестируемая камера очень похожа на более продвинутый аппарат со сменной оптикой – Panasonic LUMIX DMC-GF1, причём схож не только дизайн корпуса, но и размещение органов управления — оно практически идентично.
Корпус камеры металлический, а качество сборки находится на высшем уровне, поэтому при попытках скручивания и сдавливания камера не поддаётся и не издаёт никаких звуков. Корпусные панели покрыты чёрным лаком, на котором, несмотря на его матовую поверхность, хорошо заметны отпечатки, а вот поцарапать лакокрасочное покрытие не так и просто. В отличие от LUMIX DMC-GF1, на лицевой стороне камеры имеется резиновая накладка, поэтому ее гораздо удобнее держать, а также работать с ней с одной рукой.
Вид спереди
Спереди находится лишь объектив, а также лампа индикации автоспуска и подсветки автофокуса. На корпусе объектива установлена пара ползунков, один из которых отвечает за выбор соотношения сторон (1:1, 4:3, 3:2, 16:9), а второй — за выбор режима фокусировки (автофокус, макро, ручной).
Вид общий
Вид сзади
Сзади размещен большой дисплей, правее которого уместилась основная часть органов управления. Ближе к верху находится колёсико-кнопка, которая позволяет изменять значение экспопары или вводить экспосдвиг в программном режиме. Чуть ниже находятся клавиши блокировки экспозиции и автофокуса, кнопка перехода в режим просмотра, а также четыре многофункциональные клавиши (они же клавиши управления меню), из которых одна – программируемая. В центре круга, образованного этими кнопками, расположилась клавиша ввода, а ниже — клавиша выбора режима отображения дисплея и кнопка удаления, которая также отвечает за вызов быстрого меню «q.menu».
Вид сверху
Сверху схожесть с GF1 ещё больше. Тут расположены выбрасываемая вспышка с открывающей ее кнопкой, «горячий башмак», микрофон, диск выбора режимов работы (к слову, его ход очень мягкий, поэтому, извлекая камеру из чехла или кармана куртки, его достаточно легко сместить), двухуровневая клавиша спуска затвора с рычажком управления трансфокацией, клавиша перехода в режим съемки видео и двухпозиционный переключатель питания.
Вид снизу
Снизу находятся металлический ¼-дюймовый разъём для штатива, динамик и крышка отсека установки аккумулятора и карты памяти.
Вид слева
Слева есть лишь ушко крепления наплечного ремня, а справа, кроме крепления, находится отсек с разъёмами microUSB и miniHDM, скрытыми пластиковой подпружиненной дверцей.
Вид справа
About downloading service
| STEP 2. Download the updated version of the firmware with the following procedures, and self-extract it. | ||||||||||||
|
||||||||||||
| STEP 3. Copy the firmware file onto an SD Memory Card. Prepare an SD Memory Card with the extracted file from STEP 2 above. | ||||||||||||
|
Preparation of the SD Memory Card 17 MB or more must be free on the SD Memory Card and use an SD Memory Card which has already been formatted for the DMC-LX5. Please refer your instruction book for mode details. (Use DMC-LX5 for formatting the SD Memory Card.) |
||||||||||||
| STEP 4. Install the firmware update | ||||||||||||
Insert the SD Memory Card prepared in STEP 3 into the DMC-LX5.
If newer version or same version of firmware has already been installed, the initial setup screen(Fig. 3) will not be displayed. And the DMC-LX5 will display that «NO VALID PICTURE TO PLAY». Please turn off your camera and use the camera as is. About SD Memory Card, please refer to the Note below. Press the Up button to select YES. The update process will start (Fig. 4 and Fig. 5).
At the above screen(Fig.4), press the MENU/SET button (Fig.5) and the screen will change to Fig. 6.
Once the firmware update process is completed, the DMC-LX5 will turn off the power and turn on again then the camera will be reset to initial mode automatically. Note: |