EA PS4 GAMES
Содержание
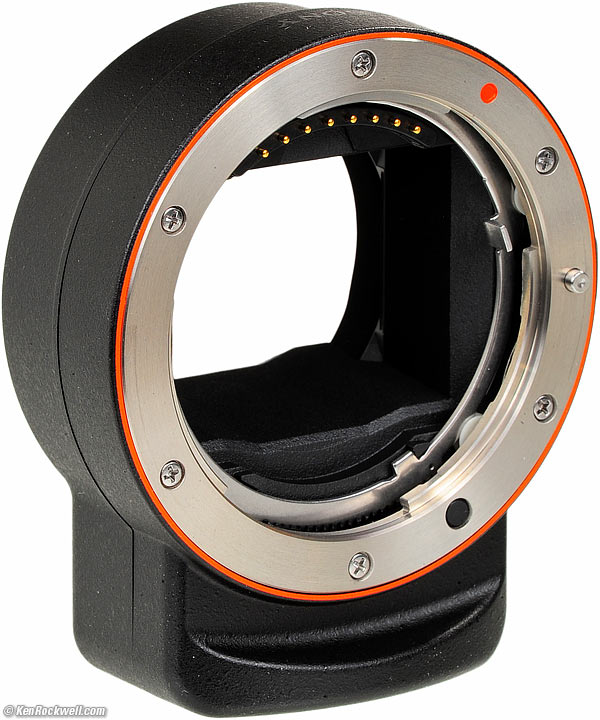
Sony LA-EA4 A-Mount to E-Mount FF Lens Adapter
Introduction
The Sony LA-EA4 A-Mount to E-Mount Lens Adapter enables you to attach virtually any A-mount lens to an Alpha E-mount full-frame digital camera body. Teleconverters and Minolta XI lenses are however not compatible.
The adapter has a built-in AF motor, aperture-drive mechanism and Translucent Mirror Technology (an SLT mirror) to enable continuous phase-detection autofocus. AF is supported with all A-mount lenses except STF models, and auto exposure will be facilitated with all compatible lenses.
Sony LA-EA4 in use
The SLT mirror inside the box directs light to both the imaging and focus sensor simultaneously as it does with all the Sony A-mount cameras like the A99 Mark II and A77 II. Adding this adapter to an E-mount camera effectively transforms it into a A-mount body including an SLT (single lens translucent) mirror.
The LA-EA4 has it’s own phase detection autofocus module that has 15 autofocus points AF with 3 cross sensors. It’s rudimentary, especially by today’s standard, but it works. And it also works similarly (relatively) well with all E-mount cameras from the Sony A7 upwards.
Autofocus also works during video recording and continuous shooting. Remember that for video, in order to protect the sensor from too much light, aperture is fixed at the maximum f/stop of the lens or at f/3.5, whichever is lower. There is also a way to fine-tune your auto-focus of each lens using the micro adjust feature in the camera’s menu.
The LA-EA4 autofocus adapter also has a tripod mount for supporting large, heavy lenses so that all the weight does not stress the lens mount.
Conclusion
The Sony LA-EA4 is an ideal companion for an early full frame mirrorless camera like the ILCE7R which only has contrast AF. The converter’s AF overrides the in-camera AF when connected and gives you a 15 point phase detection autofocus point AF system with 3 cross sensors. A drawback of the translucent mirror used for this focussing system is however the fact that you’ll lose 1/3-stop of light.
The Sony LA-EA4 is however an ideal way to give a second life to the older screw-driven Sony and late Minolta A-mount lenses like for instance the excellent SAL135F18Z. And this can be done with any E-mount camera upto the latest A9 and A7 mark 3. You should remember that a 15 point autofocus system won’t be what you’re used too by today’s standard, and that the Sony LA-EA3 adapter will work a lot better with mid to late era A-mount SSM lenses that don’t need the old mechanical screw drive system.
Sony LA-EA3 A- to E-mount adapter review
Introduction
The Sony LA-EA3 A-Mount to E-Mount Lens Adapter enables you to attach any A-mount lens to any full frame or APS-C Sony E-mount digital camera. This lens mount adapter supports Auto Exposure, Autofocus, TTL metering, Aperture and hence basically turns your A-mount lens into an E-mount lens. This is possible due to the shorter flange distance (distance from the lens mount too the sensor) of the mirrorless E-mount system compared too Sony and Minolta A-mount.
This adapter is lightweight and also has an integrated, standard 1/4″-20 tripod mount to give more support to larger and heavy lenses. You should know that autofocus is not possible with the older Sony and Minolta screw driven lenses (like the excellent SAL135F18Z) , as these use a mechanical pin to change the internal position of the elements in order to achieve focus. This is where the LA-EA4 comes in, Sony’s other adapter for excactly these kinds of lenses.
The Sony LA-EA3 uses the in-built autofocus engine of the camera, hence performance can differ depending on the camera model you’re using it with. I’ve used it excessively with the Sony A9 over the years.
Sony LA-EA3 In Use
Before the firmware v2.0 update, I had the feeling that Sony deliberately crippled the overall performance of this adapter in order to convince you to buy new E-mount lenses over using your older A-mount equipment. But since firmware version 2 and of course the better overall autofocus performance of Sony mirrorless cameras starting from the Sony A7 Mark 2 including Phase detection AF, this adapter is very useable indeed.
On my Sony A9 for instance, this update enabled the camera to focus continuously on a subject during continuous shooting at speeds up to 10 fps when using Hi or Mid Continuous Shooting mode.
Since very few people are still buying A-mount lenses, prices have dropped significantly on these, and I picked up Tamron 85mm, 45mm and 35mm f/1.8 on the cheap in the last few years. These are really excellent lenses, as good as the Zeiss designed Sony offerings, and they really work as native lenses on the Sony A9. Full continuous autofocus including Eye AF and face detection, and since these lenses have a focussing system like Sony’s own SSM they are just as fast. I would wager that if you have a relatively new APS-C camera staring from the Sony A6300 with Phase-Detection AF or a full frame A7 mark 3, that performance would be impressive too.
Conclusion
The Sony LA-EA3 might well be worth the investment if you own a few SSM A-mount lenses and a relatively new Sony camera with phase-detection AF. This combination will give you near native lens autofocus performance and at a fraction of the price too. Especially if you own a Sony A9, Sony has opened up the entire autofocus capabilities of this camera with adapted lenses in order to attract sports and wildlife photographers who still use their older A-mount telephoto primes.
If however you are looking for an autofocus adapter for the late Minolta, early Sony screw driven (non SSM) lenses, you should look at the Sony LA-EA4 which has the appropriate mechanical drive as well as it’s own phase detection autofocus system which is needed to use them with E-mount cameras.
Обзор
Сообщество KDE и их работу можно измерить в следующих моментах:
- KDE является одним из крупнейших сообществ, развивающим свободное программное обеспечение.
- Более 2500 человек участвуют в разработке программного обеспечения KDE. Примерно 20 новых разработчиков каждый месяц вносят свой первый код.
- Программное обеспечение KDE состоит из более чем 6000000 строк кода (не учитывая Qt).
- Программное обеспечение KDE было переведено на более чем 108 языков.
- Программное обеспечение KDE доступно на более чем 114 официальных FTP-зеркалах более чем в 34 странах.
- Во всех репозиториях можно найти зеркало для чтения в Github.
История
Начало
Konqi — талисман KDE
KDE был основан 14 октября 1996 Маттиасом Эттрихом, который в то время был студентом Тюбингенского университета. Его беспокоили проблемы UNIX-десктопа, одной из которых было отсутствие приложений, которые выглядели бы и вели себя одинаково. Он предложил не просто создание набора программ, а скорее среды для рабочего стола, в которой пользователь мог ожидать однородного поведения программ. Кроме того, он хотел сделать эту среду простой и понятной в эксплуатации.
Имя KDE был задуман как игра слов от существующего Common Desktop Environment (CDE), доступный для Unix систем.
Ребрендинг
Изначально вместо K было предложено использовать «Kool», но потом решили, что с K не нужно ничего делать. Поэтому KDE стал аббревиатурой расширенной до «K Desktop Environment» до того, как он был полностью откинут в пользу KDE как международное сообщество.
24 ноября 2009 года команда маркетинга KDE объявила о ребрендинге компонентов проекта KDE, мотивированная воспринятым переходом от построения среды рабочего стола к более широкому проекту вокруг «сообщества людей, которые создают программное обеспечение». Ребрендинг сосредотачивался на уменьшении акцента на среде рабочего как на «просто другом продукте», подчеркивая как сообщество, так и другие технологии, предоставляемых в качестве программного обеспечения KDE. То, что раньше называлось KDE 4, разделилось на три части: KDE Plasma Workspaces, KDE Applications и KDE Platform (теперь KDE Frameworks) — в совокупности, как «KDE Software Compilation 4» (сокращенно «KDE SC 4»). На сегодняшний день название «KDE» больше не означает «K Desktop Environment», для сообщества, которое разрабатывает программное обеспечение.
История выпусков
| Версия | Дата | Информация |
|---|---|---|
| 14 Октября 1996 | Объявлена разработка KDE | |
| K Desktop Environment 1 | 12 Июля 1998 | |
| K Desktop Environment 2 | 23 Октября 2000 | Появились значительные технологические усовершенствования: DCOP, KIO, KParts, KHTML. |
| K Desktop Environment 3 | 3 Апреля 2002 | |
| KDE Software Compilation 4 | 11 Июня 2008 | |
| KDE Plasma 5 | 15 Июля 2014 | Бывшие KDE/KDE SC были разделены на KDE Plasma, KDE Frameworks и KDE Applications |
Ultimate Collection
Are you ready for the ultimate real-time strategy experience? Gather resources, build your base, and create the most powerful armies in the world before engaging the enemy in all-out war.
Fight as the Global Defense Initiative or the Brotherhood of Nod as they clash over the rare mineral Tiberium in the classic original series. Challenge the red menace in an alternate universe in Red Alert, then step into the near future with Generals as China and the United States battle the Global Liberation Army, a terrorist organization hell-bent on bringing the world to its knees. However you play, you’ll enjoy limitless hours of RTS Command & Conquer gaming with 10 base games and 7 in-depth expansion packs.
Note: GameSpy ended all hosted game services in 2014, which affects the online multiplayer aspect of one or more games in the collection. Learn more about this in our FAQ.
Game Features:
Engage in intense, strategic battles. Make the most of every move as you order soldiers, vehicles, and aircraft across large maps filled with enemies, traps, and mission-critical resources. Move single troops, select small groups, or issue a unified attack order to all allies as you work to defeat the opponent.
Collect, create, conquer. Success in battle requires more than just a keen battle strategy. Fight for control as you struggle to collect the resources necessary to build new bases, troops, and weaponry, all while keeping the enemy at bay.
Command and Conquer everything. Explore the wide range of Command & Conquer games and fight every war from both sides! Rediscover the epic conflicts across two decades of gameplay. Take a first-person view of the C&C universe through Command & Conquer: Renegade – the series’ one and only first-person shooter – or start playing from the very beginning and enjoy the frenetic style of combat, immersive strategy and campy banter that launched a generation of strategy warfare games.
Collection includes:
- Command & Conquer
- Command & Conquer: The Covert Operations
- Command & Conquer: Red Alert
- Command & Conquer: Red Alert: Counterstrike
- Command & Conquer: Red Alert: The Aftermath
- Command & Conquer: Tiberian Sun
- Command & Conquer: Tiberian Sun Firestorm
- Command & Conquer: Red Alert 2
- Command & Conquer: Red Alert 2: Yuri’s Revenge
- Command & Conquer: Renegade
- Command & Conquer: Generals
- Command & Conquer: Generals: Zero Hour
- Command & Conquer 3: Tiberium Wars
- Command & Conquer 3: Tiberium Wars: Kane’s Wrath
- Command & Conquer: Red Alert 3
- Command & Conquer: Red Alert 3: Uprising
- Command & Conquer 4: Tiberian Twilight
Release Date
10.01.2012
Genre
Action/Strategy
Platforms
PC
Buy Now on Origin
Download Install
Installation Instructions
- Download the Update_LAEA3V200.exe file to a directory on your computer, and make note of this directory for reference.
- Go to the directory where the file was downloaded and double-click the Update_LAEA3V200.exe file.
- Remove the memory card from the camera.
- Make sure the lens adaptor is attached the camera. Note: Please make sure the camera is off before you attach the lens adaptor.
- Power on the camera. Note: If the camera has already been powered on, power it off and then back on again.
- On the camera, press the Menu button, select Setup, and then USB Connection and make sure Mass Storage is selected (this step isn’t necessary if you are using a QX series camera).
- Connect the camera to your computer using the supplied USB cable. Note: If an error message appears on the computer screen, try the following:
- Disconnect the USB cable and then reconnect it.
- If another USB port is available on the computer, try connecting the USB cable to another port.
- Verify that the remove hardware icon or is displayed in the task tray at the lower right-hand corner of the computer screen.
- After confirming the steps above, at the Lens System Software Updater screen, click Next.
- The camera screen displays the message Follow computer instructions. Notes:
- If the message The update isn’t available for your model. appears on the screen, verify that the update file is correct for the lens adaptor you have attached. If the file is correct, close the Lens System Software Updater program, disconnect the USB cable, power off the camera, and then restart the Lens System Software Updater program and continue the procedure.
- If the message Could not find the camera with the lens adaptor for this update mounted. appears on the screen, make sure you are using a compatible camera (NEX-5, NEX-3, NEX-C3, NEX-VG10, and PXW-FS7 cameras aren’t compatible) and if the camera is properly connected to the computer. Try disconnecting and reconnecting the USB cable or connect to another USB port on the computer.
- At the Lens System Software Updater screen, check the version number at the lower left. Note: If the current version is Ver.02, your lens adaptor doesn’t need this update. Stop the USB connection by clicking the remove hardware icon or in the task tray in the lower right corner of the computer screen. Then disconnect USB cable from the camera and click the Finish button on the Lens System Software Updater screen. Power off the camera, briefly remove the battery pack or the AC adaptor, and then power on the camera again. If the current version is Ver.01, click Next to continue with the update.
- The following screen is displayed and the progress bar appears while transferring data to the camera (data transfer takes approximately 5 seconds). WARNING! Do not power off the camera or disconnect the USB cable until the update process is complete.
- When the data transfer is complete, the following screen is displayed, click Finish.
- The update process starts and the progress bar is displayed on the camera screen. This process takes approximately 30 seconds to complete.
- The update process is finished when the Lens adaptor update complete. message is displayed on the camera screen. Note: If you are using the QX series, the update process is finished when the message disappears from the camera screen.
- Stop the USB connection by clicking the remove hardware icon or in the task tray in the lower right corner of the computer screen. If the icons aren’t present in the task tray, please proceed to the next step.
- Disconnect the USB cable, power off the camera, and then remove the battery pack or AC adaptor.
- Reconnect the battery pack or AC adaptor and power on the camera.
- to confirm that the update has successfully installed.
- If the version is Ver.02, the firmware update was successful.
- If the version isn’t Ver.02, download and install the update again.
Adapts Sony Alpha and Minolta MAXXUM AF lenses to E-Mount Mirrorless
Sony LA-EA3 adapter (adapts or AF SLR lenses to NEX, about $200).My biggest source of support is when you use any of , especially this link directly to it at Adorama or directly to it at Amazon, when you get anything, regardless of the country in which you live. It helps me keep adding to this free website when you get yours through those links — but I receive nothing for my efforts if you buy elsewhere. Thanks for your support! Ken.
March 2014 Sony Minolta Zeiss Nikon Canon Fuji LEICA All Reviews
This adapter lets us mount or AF SLR lenses on the compact Sony NEX cameras, especially the full-frame A7.
For autofocus, you really want the more complex LA-EA4 which has a motor to drive all AF lenses. This simpler LA-EA3 has no motor, and merely passes-through the electronic AF connections to allow AF lenses with their own interal AF motors to focus.
THIS LA-EA3 DOES NOT LET MOST LENSES AUTOFOCUS. You’ll notice that there is NO AF screw pin coming out of the black hole on the lower right.
Unless you have a lens with a built-in AF motor, there is no motor to turn the screwdriver AF connection of most of these AF lenses.
Look at the mount of your lens. If you see a big slotted screw head spin as you turn the manual focus ring, this adapter won’t work; you need the LA-EA4. If you have a newer lens with internal electronic focussing that has no spinning screw head on the mount, this simpler adapter will let your lens autofocus just great.
Even if you have to focus manually, all data and exposure modes work just fine, coupling through this simpler adapter. If you’re going to focus manually, this adapter works 100% with all lenses.
See the biggest screw at the bottom?
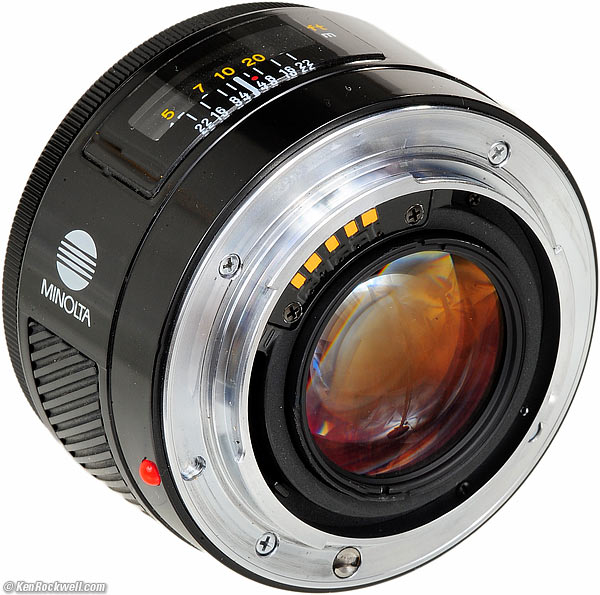
Rear, Minolta 50mm f/1.4.
That big screw on the bottom is the mechanical AF coupler. If your lens has this and it turns as you turn the focus ring, it will not autofocus with this LA-EA3 adapter. You need the LA-EA4 for AF with this lens.
Help me help you
I support my growing family through this website, as crazy as it might seem.
The biggest help is when you use any of when you get anything, regardless of the country in which you live. It costs you nothing, and is this site’s, and thus my family’s, biggest source of support. These places have the best prices and service, which is why I’ve used them since before this website existed. I recommend them all personally.
If you find this
page as helpful as a book you might have had to buy or a workshop you may
have had to take, feel free to help me continue helping everyone.
If you’ve gotten your gear through one of my or helped otherwise, you’re family. It’s great people like you who allow me to keep adding to this site full-time. Thanks!
If you haven’t helped yet, please do, and consider helping me with a gift of $5.00.
As this page is copyrighted and formally registered, it is unlawful to make copies, especially in the form of printouts for personal use. If you wish to make a printout for personal use, you are granted one-time permission only if you PayPal me $5.00 per printout or part thereof. Thank you!
Thanks for reading!
Mr. & Mrs. Ken Rockwell, Ryan and Katie.
Home Donate New Search Gallery Reviews How-To Books Links Workshops About Contact
Примечания
- ↑ . KDE. Дата обращения 10 января 2019.
- (5 November 2010). Дата обращения 6 ноября 2010.
- . Дата обращения 6 ноября 2010.
- . github.com.
- . Дата обращения 4 декабря 2010.
- . KDE. Дата обращения 25 ноября 2018.
-
. Дата обращения 26 ноября 2010.
- . Дата обращения 18 января 2015.
-
. Дата обращения 6 ноября 2010.
- . KDE. Дата обращения 20 июня 2016.
- . CIO.com (June 9, 2016). Дата обращения 20 июня 2016.
- (англ.). KDE e.V.. Дата обращения 7 июня 2008.
- (англ.). ev.kde.org. Дата обращения 18 ноября 2017.
- . Дата обращения 8 марта 2010.
- . KDE (15 октября ). Дата обращения 16 октября 2006.
- Marius Nestor. . Дата обращения 27 сентября 2015.
Организация проекта
Как и большинство проектов с открытым исходным кодом, KDE состоит из добровольцев. В работу проекта включены не только разработчики, но и участники, занимающиеся локализацией, графикой, звуковым сопровождением. Важные вопросы обсуждаются участниками проекта в списках рассылки.
Хотя разработчики и пользователи находятся по всему миру, проект сохраняет прочные позиции в Германии. Веб-серверы расположены в университетах Тюбингена и Кайзерслаутерна, немецкая некоммерческая организация (KDE e.V.) владеет товарным знаком «KDE», а конференции KDE часто проводятся в Германии.
Самобытность
Многие приложения KDE имеют букву K в своих названиях, преимущественно в качестве начальной буквы и в верхнем регистре. Однако, существуют исключения, например, Akregator, чья буква K в нижнем регистре, или AmaroK, где она вынесена в конец. Буква K во многих названиях появляется путём замены на неё буквы со сходным звучанием, то есть C или Q. Примерами могут служить названия эмулятора терминала Konsole (англ. console), или Kuickshow. С этим связаны некоторые забавные ситуации, например, написание Konsole является корректным для немецкого языка, а после длительного использования KDE и браузера Konqueror бывает трудно вспомнить правильное написание слова «завоеватель» (англ. conqueror). Иногда также буква K добавляется в качестве префикса к общеупотребимому слову, например KOffice. Такая тенденция усилилась с появлением четвёртой версии KDE. Некоторые приложения вообще не имеют буквы K в названии, например, просмотрщик изображений Gwenview.
Талисманом проекта KDE является зелёный дракончик по имени Konqi.