Руководство по съемке таймлапса
Содержание
- Time-Lapse Interval
- DSLR vs Video Resolution
- Hyperlapse App Control iPhone Time Lapse Speed
- How To Change iPhone Time Lapse Settings
- Архив записей
- Built-In Camera App Use Time Lapse Shooting Mode
- Сколько стоит начать снимать timelapse.
- How to Use Movavis Time-Lapse Software
- What Makes A Good Time Lapse Subject
- Инструкция
- Time Lapse Photography and Editing
- Choosing a Method
- Choose The Best iPhone Time Lapse App For You
- What Shutter Speed Should I set
- Обработка снимков.
- Memory Card Capacity
- Pro Tips For Capturing Incredible Time Lapse On iPhone
Time-Lapse Interval
So we want to produce a 30 second time-lapse video and we want to take 750 separate photos. Now, you have to decide on the length of the actual photo shoot. The length of the shoot depends on the subject.
Filming a flower opening may take a day or two. A major construction project could involve months. Long time lapse projects can get complicated. You will need to consider how to keep the camera powered up for long periods and how to cope with changing light levels. And you’ll need to arrange for images to be automatically transferred to a hard drive.
For these reasons, it’s best to start with a relatively short term subject that you can shoot for an hour or two. This could be something like boats on a river, a cityscape or just cloud formations.
Calculating the Shooting Interval
Let’s suppose we wanted to film two hours of activity of our chosen subject. The interval we need to program into our camera or external intervalometer is just two hours (2 x 60 x 60 = 7200 seconds) divided by the number of shots in our sequence. We’ve determined this is going to be 750.
That gives us 7200 seconds divided by 750 images which equals 9.6 seconds. We can just round this up and get the camera to take one shot every ten seconds until we have 750 photos on the card.
If you don’t want to do the maths yourself, there are plenty of handy time lapse calculators you can download to your phone. Some are free and others, like the PhotoPills app, require a modest payment.
The PhotoPills app is usually associated with planning night-time photography. It’s actually a Swiss Army knife for photographers that includes a time lapse calculator among its many useful tools.
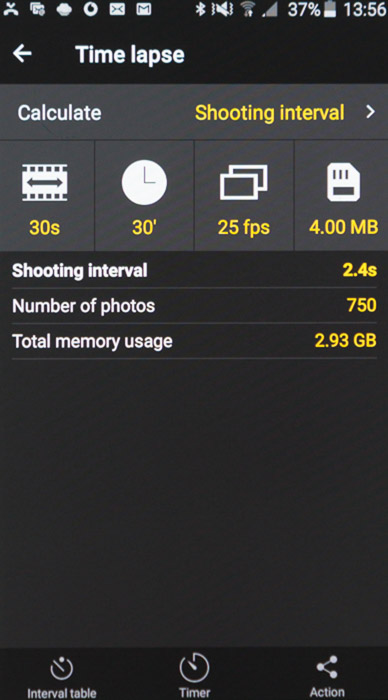 The PhotoPills time lapse calculator does all the maths for you.
In this case, a finished time lapse of 30 seconds capturing 30 minutes of real-time action to be viewed at 25 fps where each image is 4MB in size, gives a shooting interval of 2.4 seconds until 750 photos have been taken. All this will require a memory card with a capacity of at least 2.93GB.
DSLR vs Video Resolution
Two of the most fundamental settings on any camera are the image size (resolution) and image format (JPEG vs raw). Image resolution is related to the density of pixels on your camera’s sensor or on the display device. The higher the resolution, the more fine detail you can see.
Computer monitors, TVs and cameras have for years been following a relentless path toward ever greater resolution. However, there is no standardisation between the resolution of your flat screen TV and that of your camera.
The average DSLR has a much higher resolution than a 4K UHD TV (and a different aspect ratio). This means that we don’t always have to shoot at the full resolution afforded by our camera.
Here’s a scale comparison of some TV screen resolutions and the resolution of a typical DSLR.
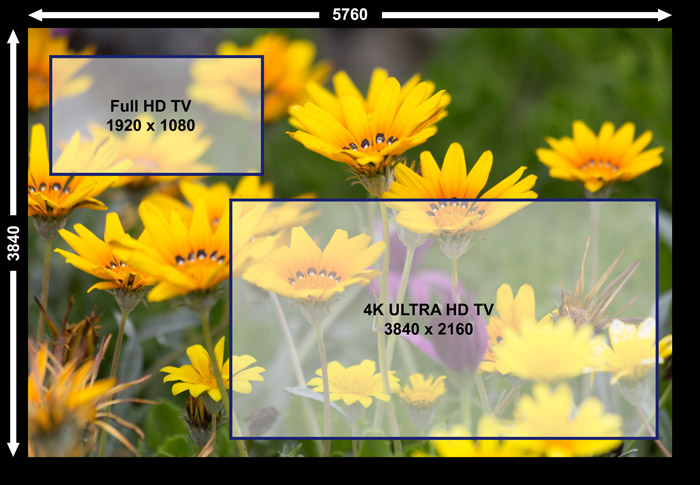 A single image from a Canon 5D Mk III has far more pixels than needed to show on a full HD or even a 4K Ultra HD TV screen. The Canon 80D has an APS-C (cropped) sensor but still sports 6000 x 4000 pixels.
The background image shows the size in pixels that you’d typically obtain from a modern DSLR. The overlays show the pixel dimensions for both full HD and 4K Ultra HD video. As you can see, the image from the camera is much larger than that actually needed to display on an HD TV – even a so called ‘4K’ TV.
Clearly, some image size reduction and cropping will be required. This will prepare your time lapse images for their intended display.
When your images are all larger than needed for the video format you’ve chosen, you will have the ability to introduce zoom and pan effects in post-production. This is known as the ‘Ken Burns’ effect. It can add interest to any video originally shot from a fixed perspective.
If you want to produce a video to show on a full HD TV (1920 x 1080), notice that the image from the camera is around ten times bigger than it really needs to be. If you want to introduce some subtle zoom and pan effects, this is probably excessively large for that.
Remember that making videos from many hundreds of images places a significant workload on your computer. It also takes up a great deal of storage space. Processing images that are larger than they need to be will only make video production slow and frustrating. One way to make the whole process more streamlined is to set your camera to work at a lower resolution.
Check the ‘Image Quality’ settings on your camera. This is the screen that enables you to select the size and compression of the JPEG images your camera makes. For most cameras that shoot raw, you can also select the raw resolution.
In this example, I’ve selected a medium resolution raw setting: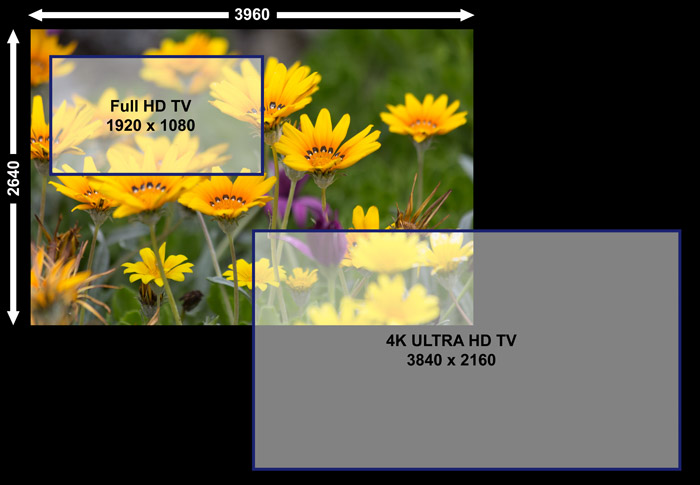
At this setting, the raw image is still large enough to more than fill the screen on a 4K UHD TV. It can also supply plenty of room for zooming and panning effects if you want to make a video for a standard HD TV. The file size it produces is half that of the full resolution setting.
You’ll be able to store twice as many images on the same media card. And your computer will process them more easily while you retain the full dynamic range afforded by using raw files.
Hyperlapse App Control iPhone Time Lapse Speed
Are you wondering how to slow down time lapse on iPhone, or how to speed it up?
The built-in Camera app doesn’t let you set the speed that your time lapse videos play back. But the free Hyperlapse app makes it easy to control your iPhone time lapse speed.
Hyperlapse is very easy to use, with a clean and simple user interface. To shoot a time lapse with Hyperlapse, open the app and tap the screen to set focus and exposure. Tap and hold if you want to lock focus and exposure. A blue circle with padlock icon appears when focus and exposure are locked.
Tap the white shutter button to start recording. When the app is recording, you’ll see two numbers next to the shutter button. The first number is the amount of time that you’ve been recording. The second is the duration of the final time lapse video.
Every 6 seconds of recording will result in 1 second of time lapse footage. So if you record for 60 seconds, you’ll end up with a 10 second time lapse video. However, you can adjust the speed and length of your video once you’ve stopped recording.
When you tap the shutter button to stop recording, your time lapse video will start playing. At the bottom of the screen you’ll see the time lapse speed slider.
By default, the speed is set to 6x. For every 6 seconds of recording, you’ll get 1 second of time lapse video.
Use the slider to change the speed of your time lapse video. Drag the slider left to slow down the time lapse speed, or right to make it faster. The faster the speed, the shorter the final time lapse video will be.
When you’re happy with the speed of your time lapse, tap the green checkmark at the top of the screen. This saves the video to your iPhone’s built-in Photos app.
On the next screen, tap New Hyperlapse to start shooting another time lapse video. You also have the option to share your time lapse to Instagram or Facebook.
Sometimes you might not want to adjust the speed immediately after shooting. If you’d rather do it later, tap the red X at the top of the screen when your video appears. Then tap Edit Later.
When you save videos to edit later, you’ll see a blue circle with a number at the bottom of the Hyperlapse screen. This indicates how many videos you have ready to edit.
Tap the blue circle to open your latest unedited video. Adjust the time lapse speed, then tap the green checkmark to save.
If you don’t want to keep the video that you just recorded, you can delete it immediately after shooting. Tap the red X instead of the green checkmark, then select Delete Hyperlapse.
Another benefit of the Hyperlapse app is its built-in image stabilization. When you shoot a time lapse video, your footage is stabilized to smooth out any camera shake.
This allows you to shoot polished time lapse videos without a tripod. Hyperlapse is perfect for shooting time lapse videos on the move. Try capturing footage while you’re walking, running, cycling, or traveling at high speed.
How To Change iPhone Time Lapse Settings
The beauty of the iPhone’s built-in time lapse feature is its simplicity. But if you’re serious about time lapse photography, you’ll want more control over your iPhone time lapse settings.
There are some great time lapse apps that let you change the settings. For example, you can change your iPhone time lapse speed to slow down or speed up the footage.
You can specify how many images get captured per second. Or you can delay the start of the recording. Some time lapse apps even let you add music or voice-over to your time lapse videos.
Next, you’ll discover how to use the Hyperlapse and OSnap apps to control your time lapse settings.
Hyperlapse lets you control the speed of your time lapse videos. OSnap gives you control over a wide range of iPhone time lapse settings.
Once you’re familiar with each app, you can decide with iPhone time lapse app best suits your needs.
Архив записей
-
2015 (10)
-
2014 (4)
-
2013 (8)
-
2012 (41)
-
2011 (8)
-
2010 (3)
- Как подготовиться к фотосессии
- Фотосъемка в студии. Советы начинающим
- Как фотографировать свадьбу
- Как показать драматизм на фотографии?
- Как сфотографировать воду
- Как подготовить цифровые фотографии к печати
- Как выбрать штатив для фотокамеры
- Сокращения в фотоаппаратах и фототермины
- Как выбрать антипарковочный барьер
Cветофильтры в современной фотографии
Памятка начинающему фотографу
10 ошибок при съемке портрета
Учимся снимать Таймлапс (Time-Lapse)
Нужен ли вам полный кадр?
- Видеокурсы по фотографии
- Бесплатный видеокурс по Lightroom 4
- Запись конференции \»Как фотографировать летом?\»
- Основы обрезки фотографий
- Типичные ошибки фотолюбителей
- Бокэ — творческий подход к фотографии
Нарушаем правила фотографии
- Оптические дефекты изображения
- Фотосъемка на морозе
- Как правильно составить договор с моделью
- Где искать модель
- 21 поза для фотосъёмки девушек
- Куда уходит резкость?
- Фотографируем краски осени
Фотосъемка в экстремальных условиях
Что означают цифры на объективах фотоаппаратов
Как избежать стандартных ошибок
- Основные авторские права фотографа
- Как фотографировать «от бедра»
- Техника фотографирования летнего пейзажа
- Фотосъемка при естественном освещении
- Контровой свет в пейзажной фотографии
- Как фотографировать радугу
- Снимаем звездное небо
- Режимы замера экспозиции
- Уход за оптикой фотокамер
- Фотостоки: максимальный доход
- Как фотографировать фейерверки
- Как фотографировать луну?
- Основные типы объективов
- Что необходимо знать фотолюбителю?
- Фотошоп или Lightroom?
- Чистка матрицы от А до Я
- Съемка в «режиме» и ночью
- Средства передачи глубины пространства
- Как фотографировать встроенной вспышкой
- Виртуальный фотоаппарат
- Размер фото для печати
- Шумы цифровых камер
- Цитаты известных деятелей искусства
- Настройка баланса белого
- Съемка портрета
- Как фотографировать зимой (снег, иней, туман)
- Фотографируйте детей, играючи!
- Сюжетные программы съемки
- Советы по композиции в фотографии
- Большой словарь фототерминов (эксклюзив)
- История фотографии. Как все начиналось…
- Макросъемка
- В поисках нейтрали
- Алгоритм выбора нового фотоаппарата
- Как правильно держать фотоаппарат?
- Жанры и виды фотографии
- Терминология цифрового фото
- Создадим свою планету
- Десять советов начинающему фотографу
- Правила съема. Где это можно делать…
- Ликбез: как работает цифровая камера
- Как снимать на улице
Built-In Camera App Use Time Lapse Shooting Mode
The time lapse shooting mode of the built-in iPhone Camera app is very easy to use. Open the Camera app, then select the Time Lapse shooting mode.
To select a shooting mode, swipe horizontally across the screen. If you’re holding your iPhone in horizontal orientation, you’ll need to swipe vertically. As you swipe, the active shooting mode next to the shutter button appears in yellow.
Just as you would when taking a still photo, you can tap the screen to set the focus point. You can then swipe up or down to adjust the exposure (image brightness).
You can also tap and hold to lock focus and exposure. You’ll see AE/AF Lock on the screen when these settings are locked. This ensures the focus and exposure don’t change, even if the lighting or subjects alter in the scene.
When you’re ready to start recording your time lapse video, tap the red shutter button. A rotating indicator appears around the shutter button when your iPhone is recording.
Tap the red shutter button to stop recording. Your time lapse video will save to the built-in Photos app on your iPhone. You’ll find it in the All Photos album, as well as the Time Lapse album. Tap the Play button (arrow in circle) to play your time lapse video
Сколько стоит начать снимать timelapse.
28 августа 2013
Теория
Итак, мы решили снимать таймлапс!
Давайте подсчитаем сколько нам потребуется денег, чтобы сделать первый ролик.
Стоимость компьютера считать не будем, он у нас уже есть, трудозатраты бесплатные — за хобби платим свободным временем. Цены смотрим на Яндекс-Маркете на момент написания этой статьи.
Для съёмки timelapse нам потребуются:
1) Фотоаппарат (в широком смысле этого слова).
2) Носитель информации.
3) Штатив или ещё какое-нибудь фиксирующее устройство.
Разделим нашу технику на четыре класса, по возрастанию качества снимков. Деление условное, качество во многом определяется конкретной техникой и условиями съёмки. Но пусть таки будут 4 класса:
мобильный телефон, «мыльница», «беззеркалка» и «зеркалка».
1) Фотоаппарат
A. Мобильный телефон с камерой. Точнее, это будет смартфон со специальной программой. Подойдёт какой-нибудь китайский Андроид за 2,5 тысячи рублей. Вроде Explay Star, МТС 962 — их таких, примерно одинаковых, много.
B. Компактный фотоаппарат, говоря по-русски «мыльница». Скорее всего это будет Canon, потому что для него существует альтернативная прошивка, в которой есть функция интервальной съёмки. Canon PowerShot A2300 нам подойдёт. Как раз он стоит 2300 рублей.
C. Системная камера со сменной оптикой, «беззеркалка». Самый лучший вариант это Nikon 1 J1. При цене 9000 рублей в аппарате есть функция интервальной съёмки.
D. Зеркальная камера начального уровня. Canon EOS 1100D Kit — от 12 000 руб.
Проводной пульт управления ищем а ебее — китайский за 500 рублей с доставкой.
2) Носитель информации.
Снимаем по-минимуму, на 1-гигабайтную карточку. Самая дешёвая и медленная карточка microSD для телефона и SDHC для фотоаппаратов стоит 200 рублей.
3) Для пары-другой роликов можно обойтись без штатива, закрепив камеру с помощью подручных средств. Но мы собираемся снимать таймлапс серьезно, поэтому покупаем штатив. Штатив с допустимой нагрузкой 2 кг — 400 руб. Фотоаппараты на штатив крепятся штатным образом, а для телефона придётся соорудить какой-то держатель. Можно конечно купить, но это противоречит нашему эксперименту.
Итого:
| А. Телефон | 3100 р. |
| В. Мыльница | 2900 р. |
| С. Беззеркалка | 9600 р. |
| D. Зеркалка | 13100 р. |
Это минимальные цифры. Худо-бедно, но снимать можно. Увеличив бюджет, можно избавиться от каких-либо недостатков, но не всегда. В общем случае, переход из класса в класс добавляет удобств и расширяет возможности.
Главное преимущество телефона — он всегда с собой. А ещё по нему можно звонить! Но чтобы от звонка не прервалась съёмка, приходится включать авиарежим. Приемлемые снимкм можно получить лишь в яркий солнечный день и лишь аппаратом с хорошей камерой, а это уже другой бюджет.
В компактах за 5-6 тысяч уже присутствуют ручные режимы — можно задать выдержку, диафрагму, чувствительность, настроить баланс белого. В дорогих же телефонах, сколько бы мегапикселов в камере и ядер в процессоре не было, экспозиция всегда выбирается автоматически. Например на сцену набежала тучка, стало темнее, камера делает более темные снимки, что естественно, а телефон подстраивается под освещение, меняет экспозицию и делает снимки с одинаковой яркостью.
Довольно часто бывает полезно использовать ручную наводку на резкость. Например при съёмке ночного неба. В большинстве компактных камер наводка происходит ступенчато, и управляется кнопками на камере. В фотоаппаратах со съёмной оптикой для этого служит специальное кольцо на объективе. Резкость навести можно проще и точнее.
Стоить заметить, что далеко не во всех беззеркалках есть функция интервальной съемки (у той-же новой модели Nikon 1 J3 уже нет). Также, далеко не во всех есть возможность подключения внешнего пульта. У зеркалок проще — пульт можно подключить к любой камере.
Получаем два полюса: телефон, который всегда с собой и посредственное качество снимков с одной стороны, и зеркальный фотоаппарат со множеством оборудования, но и с возможностью полностью раскрыть творческий замысел — с другой.
В следующий раз мы посчитаем, сколько будет стоить минута видео.
How to Use Movavis Time-Lapse Software
March 22, 2019
You’ve probably heard of time-lapse photography. This technique is an interesting hybrid of animation, still photography, and videography. You can use it to create videos in which time is compressed so that everything seems to move much faster than in real life.
To make a good time-lapse video, you’ll need a still camera or a video recorder and good video software. We recommend Movavi Video Editor – it’s an easy movie maker for both PC and Mac. If you would like to know how to do time-lapse with Movavi Video Editor, download the program and follow the tutorial below.
To inspire you, we’ve also prepared a demo video made with Movavi’s time-lapse software. Check it out!
Click the links below to view that section of the tutorial:
What Makes A Good Time Lapse Subject
Before you learn how to shoot time lapse videos, it’s a good idea to understand what makes a good time lapse subject.
Anything that moves or changes slowly is perfect for time lapse photography. The sped-up nature of a time lapse video can reveal movement that you’d barely notice with the naked eye.
Try capturing the sun rising or setting, clouds rolling through the sky, or the tide coming in at the beach. You could even create a time lapse of the moon and stars moving across the night sky.
Busy scenes can also look great in a time lapse video. Try recording a busy street scene, rush-hour traffic, or children running around. You could even look for small insects in your garden, and capture them going about their business.
Time lapse videos are also great for capturing a process over a period of time. You could record a time lapse of someone painting a picture or building a model airplane. Or light some candles and shoot a time lapse of them gradually burning down.
While time lapse videos are usually shot with the camera stationary, you can also shoot while on the move.
Try capturing a journey through a beautiful landscape. Or record your journey to work. You could also create a time lapse as you walk through a busy scene, such as a crowded city or event.
Инструкция
Многие люди, которые первый раз держат камеру в руках, не обращаются к функции таймплапс, поскольку для них ничего не понятно. Мы попытаемся разобраться в особенностях режима на примере GoPro Hero 3+ Black Edition.
- Включите устройство. Затем нажмите 3 раза кнопку Mode. На экране появится небольшой символ камеры и часов возле нее. Кроме того, на дисплее вы увидите такие показатели: угол обзора, разрешение фотографии (12, 7 или 5 Мп), частоту кадров в секунду, сколько снимков сделано и еще поместиться, уровень зарядки.
- Если вам необходимо поменять значения, зайдите в меню – один раз нажмите на кнопку Mode, а затем клацните кнопку Select. Снова используйте Mode, чтоб до щелкать до того параметра, который вы хотите изменить. Например, вы остановились на опции Timelapse GoPro (Select). Все той же кнопкой Mode выберите необходимое значение и подтвердите его. Производитель предлагает интервал от 0,5 секунд (т. е. 2 кадра в секунду) до 60 секунд (1 кадр в минуту).
- Теперь необходимо определиться с частотой съемки. Для того чтоб выбрать оптимальный режим, необходимо представить, с какой скоростью движутся объекты, которые вы желаете запечатлеть, и что вы хотите получить в итоге. Для медленно плывущих облаков и солнца выставьте интервал 10 с, для быстрых облаков и людей – 2 с. Ночные пейзажи особо хорошо получаются, если выбрать 30-секундный промежуток. Для качественной съемки в темное время суток выставляйте режим Night Lapse.
- Для съемки достаточно выбрать разрешение фотографии в 7 Мп. В пункте 2 описано, как изменить значения. По картинкам на экране вы сориентируетесь, какой показатель модифицируется.
- Снова зайдите в режим Time Lapse и на дисплее отразятся новые данные.
- Крепко установите устройство на штативе. Желательно, чтоб оно было абсолютно не подвижным, поскольку малейшие колебания испортят всю работу. Исправить дрожь можно, но для этого надо будет потратить немало времени, выискивая специальные программы и редакторы.
- Чтобы начать запись, нажмите кнопку Select. Начнется обратный отсчет. Красный светодиод будет оповещать о каждом сделанном снимке. Дайте камере определенное время (часа 2-3).
- Для завершения съемки нажмите кнопку Select. Красный индикатор мигнет три раза и сделает три звуковых сигнала. После этого в карте памяти будет достаточно снимков для того, чтоб смонтировать видео. Процесс можно осуществить в программе GoPro Studio Timelapse. Она позволяет быстро обработать существующие кадры и создать из них видеоряд. Если качество ролика получилось достаточно высокое (больше чем Full HD), становятся доступными различные эффекты: наезд, отъезд, панораму, подъем по вертикали и другие.
Несколько советов по съемке Timelapse
- Сразу обдумайте, какая должна быть частота кадров и угол съемки, чтоб потом ценные фото не пропали.
- Используйте функцию Protune, если съемка происходит в условиях недостаточной освещенности.
- Активируйте приложение GoPro App для того, чтоб увидеть, как просматривается местность. Это можно сделать путем выведения на смартфон предварительной картинки.
Используйте режим Timelapse, и вы заметите, что можете создавать шедевры!
Time Lapse Photography and Editing
If you want to learn how to make time lapse movies from the beginning and avoid going yourself the hard way of trial and error, consider getting my EBook Time Lapse Shooting and Processing. It’s a step by step guide for beginners, intermediates and even professionals and it covers the whole process of properly setting up the shooting until editing and exporting the film with LRTimelapse.
LRTimelapse
LRTimelapse will take your movies to the next level. It allows you to continuously change Adobe Lightroom or Camera RAW development parameters over the time which enables key-frame animations like in video-processing. The great advantage over post processing your time lapse sequences in your favorite video production software is the much better video quality gained from the preprocessing of the Source-files (RAW, DNG or JPG).
Furthermore, LRTimelapse is one of the best instruments to deflicker your time lapse movies. It offers a visual approach to deflicker, that works completely lossless even with multiple passes. Mutipass-Deflicker can be applied automatically, even in a background task.
Even the Holy Grail of Time Lapse Photography, seamless transitions from day to night, gets as easy as a click with LRTimelapse and the Holy Grail Wizard. You don’t even need expensive and complicated bulb-ramping devices to achieve it and get better, mostly perfect results, with a little bit of practice.
In cooperation with qDslrDashboard, the greatest Mobile App for Camera Control, you get the ability to control your camera, analyze histograms and even automatically adjust settings while the light conditions change – and all that wireless, without touching the camera, you can learn more about that here and here.
- Animate and keyframe Exposure, White Balance, and any other Lightroom editing tool over the time. You can use the full potential of Lightroom / ACR for color grading and even animate Graduated-, Radial- and Paint-Brush-Filters
- Make the “Holy Grail” of time lapse photography – (day to night transition) really easy – either by just manually adjusting your camera when shooting or by using a exposure/ISO/Aperture ramping solution like qDslrDashboard or others.
- Multipass-Deflicker with one click – do this based on the look of the developed images without having to leave the RAW-workflow. This gives you the best quality possible.
- Seamless integration with Lightroom Classic 7, 6, 5, and 4 with the powerful LRTExport plugin.
- High performance video rendering engine for high quality videos in up to 8K resolution and in MP4/H.264, ProRes (even on Windows), H.265 and MJpeg.
- and many, many more…
The LRTimelapse Pro Timer
The LRT Pro Timer is the perfect Intervalometer for your advanced timelapse work. It offers many advantages compared to standard intervalometers. Check it out!
The LRTimelapse Forum
Please feel free to join the discussion in our forum. You will get help there if you happen to encounter any problems. You are also welcome to share your experiences and workflows there too.
I will post news regarding LRTimelapse via the corresponding facebook page and twitter account @lrtimelapse. Please follow me there. My German Facebook Page is Thank you!
Choosing a Method
Method 1. Shoot a Video and Speed It Up
Making a time-lapse video with this technique is as easy as it sounds: record a long video, then open it in a video editing application and speed the footage up 5 times or more, depending on how fast you want the objects in your video to be moving or how long you want your finished video to be.
Method 2. Create a Video from Photos
This approach is more difficult, but can also be more rewarding: assemble a time-lapse video from hundreds (or thousands) of still images. You may ask: “Why should I bother with taking so many photos when I can just record a video using the first method?” Well, there are at least three good reasons:
- Quality. Your final result will look good even if made with consumer grade equipment because of the high resolution of the photos. With video, your resolution will be lower.
- Size. Videos can be space hogs, especially if you’re shooting in 4K for a long period of time (3-5 hours). Still photos will need less space on your memory card and will demand fewer computer resources for post-production.
- Fun! There’s some old-school magic and mystery in stitching photos together to produce a spectacular video. Why deprive yourself of this experience?
Choose The Best iPhone Time Lapse App For You
Choosing the best iPhone time lapse app for your needs will ensure you get great results every time. So which time lapse app is best for you?
If you don’t need to change any time lapse settings, the easiest option is to use the iPhone’s built-in Camera app. Select the Time Lapse shooting mode, then tap the shutter button to start shooting.
Time Lapse mode in the Camera app offers an easy way to shoot time lapse videos
If you’d like to control your iPhone time lapse speed, the Hyperlapse app is a great option. The speed slider makes it easy to slow down or speed up your footage. It also has image stabilization which smooths out shaky footage when hand-holding the camera.
Hyperlapse app lets you easily control your iPhone time lapse speed
For ultimate control over your iPhone time lapse settings, it’s definitely worth downloading the OSnap app. This app is quite complex, but it’s perfect for shooting professional-quality time lapse videos.
OSnap app gives you ultimate control over your iPhone time lapse settings
What Shutter Speed Should I set
If you set your camera to ‘Movie Mode’ to make a real-time video directly in the camera, you would typically be shooting at a frame rate of 25 fps. This means that the effective shutter speed for each frame in the image cannot be slower than 1/25 second. The exposure wouldn’t otherwise be complete before the next frame in the sequence needed to be shot.
There is, however, nothing to stop you from selecting a much faster exposure.
This range of exposure time is expanded all the more when you make your video from a series of single photos. The effective shutter speed can approach the selected shooting interval.
For example, if you’re taking one photo every ten seconds, the shutter speed you select for each photo could be anything from eight seconds up to the fastest value your camera affords (light levels permitting). Note that you can’t set the shutter speed to be exactly ten seconds in this example. We have to give the shutter time to close and open again.
For subjects that are moving very slowly (such as a flower opening), the shutter speed is not that critical. The subject is unlikely to be moving to any degree during the exposure. And the camera will almost certainly be on a tripod.
Let’s say you’re shooting a night-time movie of the stars. Your slowest shutter speed will be limited by the onset of star trails and the fastest shutter speed by the available light and lens aperture.
The situation is rather different when shooting cars at a busy interchange during the day. You might have determined that you need to take one photo of the interchange every five seconds and want to know the best shutter speed to use.
Theoretically, your shutter speed could be anything from say 1/4000 sec to as slow as 4 seconds. What difference will this make to the final video?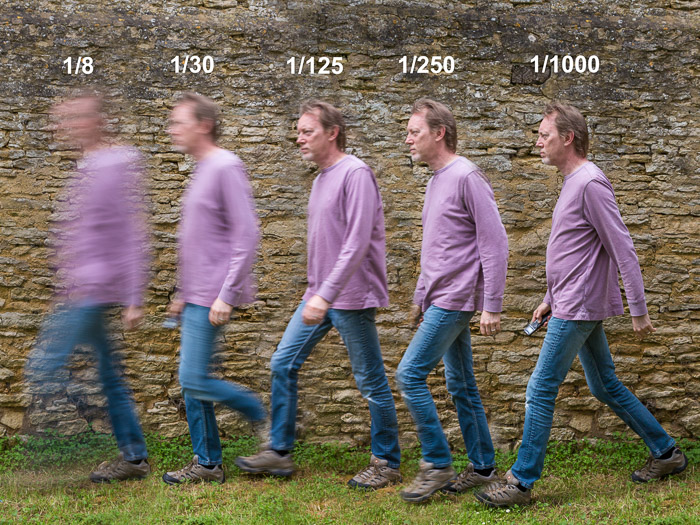
The answer is largely one of artistic interpretation. What impression are you trying to convey? If each exposure is relatively fast (say 1/1000 sec), then your video will essentially comprise a series of still photos of cars. When viewed individually, they’ll look like they’re all stationary. Viewed in sequence, they will appear to jump from one position to another in a very unnatural manner.
If you were really watching a video of a morning commute at 200 mph, you’d expect each frame to show at least some motion blur. For a more fluid fast motion effect, reduce the shutter speed to say 1/15 sec or even slower. You can see the effect of changing the shutter speed for a subject moving at the same rate in the header image.
You might find that you can’t achieve a slow enough shutter speed for the effect you want to achieve. This often happens when shooting in bright sunlight. If you do run into this problem, invest in a neutral density filter. This will cut down the light by several stops and allow you to use a slower shutter speed. We also have a great article on using a ND filter to remove people from long exposure shots which you can check here.If you’re after some inspiration for time-lapse photography subject ideas, check out our tips on urban or adventure photography for a start! We also have a great tutorial on how to create a time-lapse with Photoshop.
Обработка снимков.
Если вы снимали в jpeg и обрабатывать фото не нужно, то можете пропустить этот раздел и сразу перейти к созданию таймлапса.
Итак, мы имеем множество снимков, которые нужно обработать. Это можно сделать в любой программе, но лучше, если это будет программа, где вы смогли бы обработать одно фото из серии, а потом скопировать параметры на все остальные снимки. Такое можно сделать в Photoshop (фотошоп), но мне больше нравится использовать Lightroom (лайтрум). Что бы не затягивать статью я не стану расписывать подробно, ведь все это можно узнать из руководства к программе. Обрабатываем один снимок из серии по своему вкусу, корректируем. После применяем эту корректировку ко всей серии фотографий. И сохраняем наши фотографии. Мы будем делать по простому и что бы файлы не занимали слишком много места. Поэтому сохраним в JPG.
Memory Card Capacity
You can shoot JPEG images if you want to fit as many images as possible onto a given media card. I would, however, recommend that you shoot raw for maximum post-production flexibility.
Check the file size of a single raw photo for your chosen camera. Make sure you have room for 750 such images on your memory card.
For example, on a Canon 5D Mk III the raw file size is around 30MB. Multiplying 30MB by 750 gives 22,500MB or 22.5 GB. A 32GB memory card will easily handle this many raw images.
Once you’ve set your camera’s image size and quality settings, the number of remaining shots should be visible on your camera’s LCD.
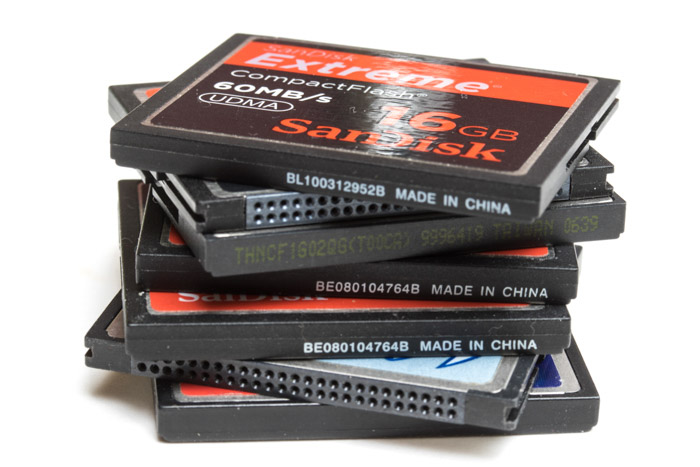 You will not be recording a burst of images in rapid succession. This means that the write speed of the media cards you use for time lapse (CF or SD) is not as important as their capacity.
If you don’t have a high capacity memory card, you can just keep an eye on the remaining exposures. Swap in a new smaller capacity card each time you run out.
For time lapse, a high capacity card doesn’t have to be of the expensive high speed variety. It’s the capacity that counts – not the write speed.
Pro Tips For Capturing Incredible Time Lapse On iPhone
Knowing how to use a time lapse app is a great start. But to help you capture amazing time lapse videos, here are some tips you should follow.
Shoot For At Least A Few Minutes
You’ll need to record for a lot longer than you want your finished time lapse video to be. If you only shoot for a few seconds, you won’t have much video footage to play back once it’s been sped up.
You generally need to shoot for at least a few minutes. But don’t be afraid to shoot for several hours if the scene you’re capturing is changing very slowly. Some scenes, such as a tree changing through the seasons, may require you to capture a single frame every 24 hours or more.
Use A Tripod For Shake-Free Footage
To avoid shaky time lapse videos, use an iPhone tripod, together with an iPhone tripod mount. Or rest your phone on something steady while you record.
Hands-free shooting is especially useful for recording a scene over several minutes or hours. You can set your iPhone up on the tripod, and leave it recording for the duration.
Another interesting technique is to mount your iPhone on a rotating cookery timer. As it slowly rotates, it creates amazing smooth panning footage.
If you want to capture a time lapse video while you’re on the move, use the Hyperlapse app. This app has built-in image stabilization to smooth out shaky footage.
Use Good Composition
Set up your camera in the best position to capture your subject or scene. Choose your viewpoint carefully. And use proven composition techniques to add to the visual appeal of the video.
In this time lapse of a train station, the bridge and train tracks act as leading lines. They do a great job of leading your eye from the front of the scene into the distance where the train appears from.
Other composition techniques include framing your scene, using the rule of thirds, and including foreground interest.
If your subject is likely to move within the scene, compose your shot with enough room to capture them as they move.
Consider The Weather & Sky
If you’re shooting outdoors, consider how the weather will affect your video. A dull gray sky won’t be very interesting.
But a blue sky with white fluffy clouds moving through the scene will add extra interest to your time lapse. Shooting at sunrise or sunset will add beautiful colors to your scene.
Lock Focus & Exposure
Do you want focus and exposure to remain the same, even if the light or subjects in the scene change? If so, ensure you lock the focus and exposure before shooting.
In the Camera app and Hyperlapse app, tap and hold to lock focus.
In OSnap, use the padlock icons. In this app you can also lock white balance.