Инструкции и руководстваOlympus E-PM1
Содержание
Особенности камеры
Как и остальные системные фотоаппараты Olympus, камера оборудована портом для подключения дополнительных аксессуаров, а среди них есть и весьма интересные гаджеты, например PENPAL PP-1, который позволяет пересылать отснятый материал на смартфон по каналу Bluetooth. Решение весьма интересное и нужное, ведь иногда возникает необходимость выслать снимки в «полевых» условиях, когда ноутбука нет под рукой, а перетянуть снимки на смартфон невозможно. Конечно, есть и гораздо более дешёвый способ — достаточно иметь в хозяйстве карту памяти microSD, которую при необходимости можно переставить в телефон, но всё же PENPAL PP-1 куда более удобен. Плохо лишь то, что вспышка у новинки съёмная, при этом устанавливается она в тот же аксессуарный порт, поэтому аксессуары приходится часто менять местами.
Full HD-видео для системных камер, не считая некоторых исключений вроде Sony NEX-C3K, сейчас уже норма, как, впрочем, и поддержка формата AVCHD. Так что Olympus PEN E-PM1 нас ничем в этом отношении не удивила. Однако нельзя не отметить режим художественной съёмки ART, который включает шесть различных настроек (поп-арт, мягкий фокус, зернистость, пинхол, диорама и расширенная тональность).
Кроме того, в камере предусмотрена съёмка 3D-фото, но, как и в недавно рассмотренных компактах серии Traveller, автоматическая съёмка 3D-фото невозможна — приходится делать отдельный снимок, после чего совмещать контуры первого кадра и изображения на экране, а уж после этого снимать вручную второй кадр. В общем, одна из самых сложных и неудобных реализаций данной функции в однообъективных камерах, ведь, например, в фотоаппаратах Sony и Panasonic достаточно один раз нажать клавишу спуска и провести немного камеру.
Olympus PEN Mini E-PM1 shooting modes
Shooting modes on the E-PM1 are accessed via the menu screen. In iAuto mode the Live Guide screen provides access to saturation, white balance and exposure controls presented in a non-technical way with slider controls. So changing white balance, or widening the aperture to limit depth of field simply involves rotating the control dial to move a slider between ‘flat and muted’ and ‘clear and vivid’, or ‘blur and sharp’.
|
|
In PASM modes the E-PM1 provides good access to exposure settings which are activated by pressing the up position on the control wheel. In Program auto mode you can then shift the aperture/shutter speed combination either by up/down pushes on the control wheel or by rotating it, with exposure compensation achieved by pushing the left/right positions.
The E-PM1 lacks the composite modes of the NEX-C3; it does have a DIS scene mode designed for low-light conditions but this is a single shot mode. Likewise the PEN E-PM1 has a panorama mode which it turns out is does nothing more than provide guides for you to take overlapping shots which can subsequently be stitched on your PC with the supplied software. It’s a far cry from the instant high resolution Sweep panorama mode of the NEX-C3. There are however a couple of shooting modes that are a little out of the ordinary. With Multiple exposure you can overlay two shots to simulate what happens in a film camera if you shoot without winding the film on. You can also overlay three raw images to create a composite. There’s also a 3D mode which takes two shots, the second automatically after you’ve moved the camera a couple of inches to the right. You can’t see the 3D image on the E-PM1’s screen, but the 1920 x 1080 image is saved with an MPO file and can be viewed on a 3D TV.
Olympus PEN Mini E-PM1 Design and controls
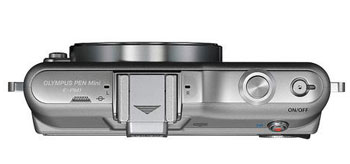
It’s called the PEN ‘Mini’ for a reason: the E-PM1 is an extremely compact ILC. It’s similar in style and dimensions to the next model up in the range, the PEN ‘Lite’ E-PL3, but lacking the flip-out screen is a fair bit slimmer. As well as the screen the Mini lacks the PEN Lite’s mode dial and several other buttons, but from the front the two models look more or less identical. The NEX-C3 is actually a little bit smaller and lighter than the PEN E-PM1, but add on the stabilised 18-55mm kit zoom and that advantage evaporates. The Panasonic Lumix GF3 is a little taller than the PEN E-PM1 and its 14-42mm stabilised kit lens, though not as big as the Sony 18-55mm also adds considerably to the overall size.
 |
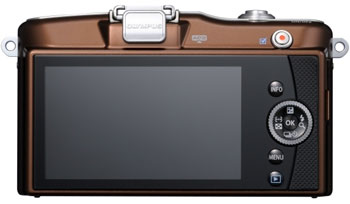
Despite the fact that it has no front grip the PEN E-PM1 feels comfortable and secure with your left hand supporting the lens. On the rear there’s a rubberised grip pad that runs from top to bottom along the right side. The rear controls are quite small but the control dial with its knurled edge is easy to operate and the clear plastic info, menu and playback buttons inset into the plastic cover of the screen are a nice design touch. If you’re looking for a colourful body the E-PM1 is available in silver, black, brown, silver-rose, purple, and white. There’s also a range of underwater accessories including the PT-EP06L underwater housing which is waterproof to a depth of 45 metres.
The 3in LCD screen has an aspect ratio of 16:9 – great for HD movies, but you lose nearly a quarter of the area when shooting 4:3 stills in the best quality mode. The screen has a 460k pixel resolution and is bright and contrasty; though the illumination drops off a little when held at an angle you can see the image even at quite acute angles so shooting overhead is manageable, but obviously nothing like as versatile as a flip-out screen.
 |
|
|
Compared with screens on other PEN models the PEN Mini’s screen looks and feels a bit ordinary. The PEN E-P3 has a 614k dot OLED touch screen and the E-PL3’s screen flips out, as does the one on the Sony NEX-C3. Then there’s the Panasonic Lumix GF3 with its 3:2 aspect ratio touch-screen. So while there’s nothing wrong with PEN E-PM1’s screen, compared with what’s on offer from the competition and on other PEN models it lacks lustre. You can’t help but wonder what the thinking was behind Olympus’ decision to provide a touch screen on the top of the range E-P3 and omit it on the E-PM1 which, lacking many of its higher end stablemate’s physical controls and aimed at novice users is arguably much more in need of a touch interface.
Olympus PEN Mini E-PM1 lens and stabilisation
The Olympus PEN E-PM1 is available as a kit with a choice of lenses including the M Zuiko digital 14-42mm f3.5-5.6 that I tested it with. This lens features a clever collapsible mechanism which allows it to shrink considerably when not in use. A sliding catch on the zoom ring allows rotation beyond the 14mm stop which completely retracts the extending barrel into the main housing. The ‘crop factor’ on the micro Four Thirds lens system is 2, so the 35mm equivalent focal length of this lens is 28-84mm – a 3x optical zoom range which takes you from wide angle to a short portrait telephoto.
| Olympus M.Zuiko Digital 14-42mm f3.5-5.6 coverage wide | Olympus M.Zuiko Digital 14-42mm f3.5-5.6 coverage tele | |
 |
 |
|
| 14-42mm at 14mm (28mm equivalent) | 14-42mm at 42mm (84mm equivalent) |
One of the advantages of the Micro Four Thirds system is having access to the largest range of native lenses for any ILC. With the Olympus 17mm f2.8 prime attached, the E-PM1 is just about coat-pocketable. Other zoom lenses in the range include a 40-150mm f4-5.6, 75-300mm f4.8-6.7, and a 9-18mm f4-5.6 ultra wide angle zoom. You can of course also mount Micro Four Thirds lenses from third parties, including a number of tempting options from Panasonic, including the 20mm f1.7 and 14-42mm Power Zoom pancakes, although you may find some focusing restrictions.
|
Olympus PEN E-PM1 14-42mm f3.5-5.6 IS Off/On |
||
 |
 |
|
| 100% crop, 14-42mm at 42mm, 200 ISO 1/10, IS off. | 100% crop, 14-42mm at 42mm, 200 ISO 1/10, IS on. |
The E-PM1 body has built-in sensor-shift stabilisation which you can use regardless of the lens attached- a key advantage over ILCs from Panasonic, Sony and Nikon. The stabilisation has three positions for stabilisation in the vertical or horizontal planes or both. To test the stabilisation on the Olympus E-PM1 I set the kit zoom to its maximum 42mm (84mm equivalent) focal length and took a series of shots in Shutter Priority mode at progressively slower shutter speeds both with stabilisation turned on in auto (both axes) mode and with it turned off.
As you can see from the crops above, the PEN E-PM1 is just about able to manage three full stops of stabilisation. The 1/10 crop is a little soft, the camera shake hasn’t entirely been eliminated, but you’d just about get away with this at smaller sizes. It took me several attempts to this result at 1/10, possibly because of the smaller body and lack of a grip, the E-PM1 stabilisation isn’t quite as effective as on the E-PL3.
Дисплей и интерфейс
Дисплей точно такой же, как и у модели E-PL3, — 3 дюйма по диагонали и разрешение 460 тыс. точек, вот только поворотной конструкции не предусмотрено. Дисплеи камер Olympus всегда были одними из лучших, и тестируемая камера — не исключение: углы обзора огромны, цветопередача великолепна, а на солнце, традиционно для камер Olympus, изображение и информация читается без проблем. В общем, замечания есть только к тонкой защите дисплея, которая запросто прогибается вплоть до соприкосновения с матрицей.
Тестируемая камера, в отличие от E-P3 и E-PL3, лишена круглого селектора режимов съёмки, поэтому главное окно меню немного отличается от оного у старших камер. Фактически при нажатии клавиши меню пользователь попадает не в основное меню, а в красочный виртуальный селектор режимов работы камеры. В остальном меню совершенно не отличается от интерфейса камеры E-PL3, которая недавно побывала у нас на тестировании. Ниже для ознакомления приведено несколько снимков экрана:
|
Главное окно съёмки |
Выбор разрешения и формата сохранения видео |
|
Выбор режима работы вспышки |
Выведение коррекции вспышки |
|
Выбор режима экспозамера |
Выбор режима работы фокуса |
|
Выбор уровня чувствительности |
Настройка режима определения лиц |
|
Отключение звуковой дорожки при видеозаписи |
Выбор режима стабилизации |
|
Выбор режима цвета |
Выбор настройки баланса белого |
|
Выбор режима протяжки |
Выбор соотношения сторон |
|
Выбор качества сжатия и формата сохранения снимков |
Главное меню |
|
Выбор режима художественной обработки |
Выбор сюжетной программы |
|
Настройка параметров фотосъёмки |
|
|
Полноэкранный просмотр |
Просмотр базовых метаданных и гистограмм |
|
Редактирование файла |
Управление снимками |
|
Обработка снимков |
Матрица миниатюр 5х5 |
|
Календарь съёмок |
Просмотр максимально увеличенного фрагмента |
Olympus PEN Mini E-PM1 movie modes
The PEN Mini E-PM1 has the same movie modes as the E-PL3. The best quality movie mode is 1080i60 which is encoded as an AVCHD file at an average bitrate of 17Mbps. There’s also a 13Mbps option at the same resolution and two 720p settings at 17Mbps and 13Mbps. Finally, there’s a 720p option that records editing-friendly MJPEG files at 30fps and a standard resolution 640×480 mode.
Movies can be shot in any of the PASM modes with the ability to set the shutter speed or aperture prior to recording in PASM modes. In PAS modes you can use exposure compensation for plus or minus three stops. The Panasonic Lumix GF3 which shares the PEN E-PM1’s 1080i60/50 best quality video mode doesn’t provide the same degree of video exposure control, but does allow you to control focus manually using its touch screen. And with a best quality movie mode of 720p30, the Sony NEX-C3 provides aperture, but not shutter speed control, so I’d say the E-PM1 has a definite advantage here.
It’s great to have the option of shooting movie footage using the Art filters (you can see an example of the miniature Art filter in action in our Olympus E-P3 review), something that’s also possible on the Lumix GF3 and NEX-C3, though many of them result in slow jerky playback at severely reduced frame rates. You can shoot a still image during movie recording (though recording stops, then a new clip is started) and there’s an option to automatically take a shot at the end of each clip.
The E-PM1’s sensor-shift stabilisation is substituted in video modes by a digital system which analyses each frame and post processes it to align the edges. This can produce some peculiar artefacts with moving subjects and when panning. When you combine both, such as the fast flowing river in our outdoor panning example, the results can be particularly unpleasant.
The maximum recording time in AVCHD is 29 minutes, or when the file size limit of 4GB is reached. Olympus recommends SD cards with a speed class rating of 6 or above for video recording.
|
|
|---|---|
|
|
|
|
When stationary, the PEN E-PM1’s best quality 1080i60 video mode produces good results, but the moving water in this clip and, to a lesser degree, panning causes some very noticeable jittering.
|
|
|---|---|
|
|
|
|
With the stabilisation disabled for this tripod-mounted shot, the jittering is no longer evident. The exposure takes a while to sort itself out and the focus wanders during zooming, but quickly corrects itself.
|
|
|---|---|
|
|
|
|
The focus is a little unsure in this interior low light panning clip but the exposure is responsive without stepping and the colour balance is good.
handling
Press the on/off switch and the Olympus E-PM1 is ready to take a shot in around a second; it’s impressively quick. As on the Lumix GF3 the absence of a mode dial feels like a compromise, but maybe that’s only because there’s the E-PL3, (or in the case of the Panasonic Lumic GF3 the much earlier GF1) to compare it with. With the Sony NEX-C3 it’s a case of not missing what you never had.
The E-PM1’s mode dial functions perfectly well for controlling exposure in PASM modes and, like other models in the PEN range, the E-PM1 doesn’t lack customisation potential. You can assign custom functions to the record button (using the shutter release to start video recording having first selected movie from the mode menu) and the right and down buttons on the control dial. But you can’t assign shooting modes to the E-PM1’s custom buttons the way you can on the NEX-C3.
One of the strengths of the PEN range is that its shooting options are very accessible via the Live Control screen. Pressing the OK button at the centre of the control dial displays Live Control settings down the right side of the screen with options displayed along the bottom. Alternatively the Super Control Panel displays everything (except the shooting mode) on one tabulated screen.
Conversely, the way the PEN E-PM1 displays information overlays is a little frustrating. Pressing the info button toggles though the options including a grid, live histogram, highlight and shadow clipping display and view magnification, but you can only see each of these individually, it’s not possible to see the histogram with the clipping display and none of the ancillary overlays displays the shooting info so if you display the histogram for example, you lose not only the grid, but the ISO, shooting mode, picture mode, picture quality, video quality and remaining recording time readouts.
The PEN E-PM1 has two continuous shooting modes, Sequential L and Sequential H, the latter providing quoted speeds of 5.5fps with the stabilisation turned off and with focus and exposure locked on the first frame. I tested the PEN E-PM1’s fastest continuous shooting by fitting it with a newly formatted Lexar 16GB 133x SCHD card with a speed class rating of 10. I set the picture quality to Large Fine and turned off image stabilisation. With the shutter held down the E-PM1 fired off a burst of 9 frames at exactly 5.5fps before slowing to around 2fps. That’s more or less the same as the Sony NEX-C3’s 5.9 fps and marginally better than the Lumix GF3 at just over 4fps.
The E-PM1’s 12.3 Megapixel Four Thirds sensor produces 4:3 images with a maximum size of 4032 x 3024 pixels. Images can be saved as RAW data files or JPEGs at one of two compression settings. Best quality JPEGs have a file size of between 4 and 6MB. The ISO sensitivity ranges from 200 to 12800 ISO and the shutter speed range is from 60 seconds to 1/4000 plus Bulb.
To see how the quality of the Olympus PEN E-PM1 measures-up in practice, take a look at our real-life resolution and high ISO noise results pages, browse the sample images gallery, or skip to the chase and head straight for our verdict.
