Режимы picture control, Выбор picture control, 135 режимы p, s, a и m
Содержание
- Создание пользовательских режимов Picture Control
- Установка
- Выбор Picture Control
- Standard RGB profiles supplied in ViewNX-i
- Profiles with a Gamma Value of 1.8
- Profiles with a gamma value of 2.2
- sRGB: NKsRGB.icm (Windows)/Nikon sRGB 4.0.0 (Mac OS)
- Bruce RGB: NKBruce.icm (Windows)/Nikon Bruce RGB 4.0.0 (Mac OS)
- NTSC (1953): NKNTSC.icm (Windows)/Nikon NTSC (1953) 4.0.0 (Mac OS)
- Adobe RGB (1998): NKAdobe.icm (Windows)/Nikon Adobe RGB (1998) 4.0.0 (Mac OS)
- CIE RGB: NKCIE.icm (Windows)/Nikon CIE RGB 4.0.0 (Mac OS)
- Adobe Wide RGB: NKWide.icm (Windows)/Nikon Adobe Wide RGB 4.0.0 (Mac OS)
- Изменения, внесенные в версию 2.0.2
- Selecting a Picture Control
- Color Reproduction Process
- Изменение режимов Picture Control
- Nikon Picture Control Utility 2.1.0 Software Downloads
- Modifying Picture Controls
- Picture Control Parameters
Создание пользовательских режимов Picture Control
Режимы Picture Control, входящие в комплект поставки фотокамеры, можно изменить и сохранить как пользовательские режимы Picture Control.
-
Выберите Сохранить/изменить.
Выделите Сохранить/изменить и нажмите 2.
-
Выберите режим Picture Control.
Выделите существующий режим Picture Control и нажмите 2 или нажмите J, чтобы перейти к шагу 4 для сохранения копии выделенного режима Picture Control без дальнейшего изменения.
-
Редактирование выбранного режима Picture Control.
Чтобы отменить любые изменения и начать снова с настроек по умолчанию, нажмите кнопку O (Q). После выполнения настроек нажмите J.
-
Выбор места назначения.
Выберите место назначения для пользовательского режима Picture Control (от C-1 до C-9) и нажмите 2.
-
Присвойте имя режиму Picture Control.
Отобразится диалоговое окно для ввода текста. По умолчанию новые режимы Picture Control именуются путем добавления двухзначного числа (назначается автоматически) к имени существующего режима Picture Control; чтобы выбрать другое имя, переименуйте режим Picture Control, как описано в разделе «Ввод текста» ( ). Коснитесь кнопки выбора клавиатуры для последовательного переключения между клавиатурой верхнего регистра, клавиатурой нижнего регистра и клавиатурой символов. Максимальная длина имени пользовательского режима Picture Control – 19 знаков. Любые символы после девятнадцатого будут удалены.
Область имени
Область клавиатуры Выбор клавиатуры
Параметры пользовательского режима Picture Control
Параметры, доступные для пользовательских режимов Picture Control, аналогичны параметрам, на основе которых был создан пользовательский режим Picture Control.
Символ исходного режима Picture Control
Исходный предустановленный режим Picture Control, на котором основан пользовательский режим Picture Control, обозначается символом в верхнем правом углу экрана редактирования.
Символ исходного режима Picture Control

C Меню режима фотосъемки: Параметры съемки
Банк меню реж. фотосъем.
Расшир. банки меню фотос.
Папка для хранения
Наименование файлов
Выбор основного гнезда
Функция дополнит. гнезда
Управление вспышкой
Область изображения
Качество изображения
Размер изображения
Запись изображ. NEF (RAW)
Настройки чувствит. ISO
Баланс белого
Режим Picture Control
Работа с реж. Picture Control
Цветовое пространство
Активный D-Lighting
Под. шума для длинн. экспоз.
Под. шума для выс. ISO
Контроль виньетиров.
Авт. управление искаж-ями
Подавление мерцания
Установка автобрекетинга
Мультиэкспозиция
HDR (расш. динам. диап.)
Съемка с интервалом
Съемка со сдвигом фокусировки
Бесшумн. фотос. «Live view»
Установка
- Для установки данного программного обеспечения необходимы права администратора.
- Прежде чем продолжить установку, закройте ViewNX 2 и все другие работающие программы и отключите антивирусное программное обеспечение.
- Загрузите файл, соответствующий вашей операционной системе, и запустите его.
- Данное программное обеспечение несовместимо с View NX версии 1.x, Capture NX и Capture NX 2. Пользовательские режимы Picture Control с расширением файла NP2 в указанных приложениях не поддерживаются. Для работы с файлами с расширением NP2 используйте программное обеспечение ViewNX 2 версии 2.10.0 или более поздней либо Capture NX-D версии 1.0.0 или более поздней.
|
ОС Mac OS X
|
Соглашение
Принять
Пожалуйста, выберите свой регион из списка меню.
— ЯпонияСША или Латинская АмерикаЕвропаКанадаАзия, Океания, Средний Восток, Африка, другие страны
Принять
Пожалуйста, выберите свой регион из списка меню.
— ЯпонияСША или Латинская АмерикаЕвропаКанадаАзия, Океания, Средний Восток, Африка, другие страны
Выбор Picture Control
Выберите Picture Control в соответствии с объектом съемки или типом сюжета.
- nАвто
- Фотокамера автоматически настраивает оттенки и тоны на основании параметра Стандартный режима Picture Control. Цвет лица на портретных снимках также будет мягче, а листва и небо на снимках, сделанных вне помещения, будут более насыщенными, чем на снимках, сделанных с параметром Стандартный режима Picture Control.
- QСтандартный
- Стандартная обработка снимков для получения сбалансированного эффекта. Рекомендуется в обычных случаях.
- RНейтральный
- Минимальная обработка снимков для получения естественных результатов. Рекомендуется использовать для фотографий, которые будут подвергнуты обработке или ретушированию.
- SНасыщенный
- Обработка снимков для получения насыщенных фотоотпечатков. Рекомендуется использовать для фотографий, на которых необходимо подчеркнуть основные цвета.
- TМонохромный
- Съемка монохромных фотографий.
- eПортрет
- Обработка портретов для получения естественной текстуры кожи и придания ей гладкости.
- fПейзаж
- Для создания ярких пейзажей и городских видов.
- qРавномерный
- Детали сохраняются в широком диапазоне тонов, от засвеченных до затененных областей. Рекомендуется использовать для фотографий, которые будут позже подвергнуты интенсивной обработке или ретушированию.
-
Выберите Режим Picture Control.
Выделите Режим Picture Control в меню режима фотосъемки и нажмите 2.
-
Выберите Picture Control.
Выделите Picture Control и нажмите J.
Пользовательские Picture Control
Пользовательские Picture Control создаются путем изменения существующих Picture Control при помощи параметра Работа с реж. Picture Control в меню режима фото- или видеосъемки ( Работа с реж. Picture Control, Работа с реж. Picture Control). Пользовательские Picture Control можно сохранить на карте памяти для обмена с другими фотокамерами той же модели и совместимым программным обеспечением.
Индикатор Picture Control
Текущий Picture Control показан на экране.

Информационный экран

Экран режима съемки
Standard RGB profiles supplied in ViewNX-i
Profiles with a Gamma Value of 1.8
Apple RGB: NKApple.icm (Windows)/Nikon Apple RGB 4.0.0 (Mac OS)
This profile is used in desk-top publishing applications and in Adobe Photoshop versions 4.0 or earlier, and is the typical RGB profile for Mac OS monitors. The corresponding RGB setting in Adobe Photoshop is «Apple RGB». This profile is suitable for working with images displayed on the Mac OS.
ColorMatch RGB: MKCMatch.icm (Windows)/Nikon ColorMatch RGB 4.0.0 (Mac OS)
The ColorMatch profile is native to Radius PressView monitors. It has a wider gamut than Apple RGB, with a particularly wide area devoted to the reproduction of blues. The corresponding RGB setting in Adobe Photoshop is «Color Match RGB».
Profiles with a gamma value of 2.2
sRGB: NKsRGB.icm (Windows)/Nikon sRGB 4.0.0 (Mac OS)
This RGB profile is used in the majority of Windows monitors. It closely resembles the RGB commonly used in color television, and is also used in the digital television broadcasting system that is on its way to becoming the industry standard in the United States of America. Software and hardware manufacturers use it as a default color profile and guarantee operation when it is used. It is also on its way to becoming the standard for images on the web. This profile is suited to users who plan to use their digital images «as is,» without editing or printing them. It however suffers from the drawback of a narrow gamut with a limited area available for reproducing blues. The corresponding RGB setting in Adobe Photoshop 5.0 and 5.5 is «sRGB,» the corresponding setting in Adobe Photoshop 6.0 «sRGB IWC61966-2.1».
Bruce RGB: NKBruce.icm (Windows)/Nikon Bruce RGB 4.0.0 (Mac OS)
This color profile attempts to expand on the ColorMatch RGB gamut by defining the chromaticity for G as lying between the values for G in the Adobe RGB and ColorMatch color-space profiles. It was proposed by Bruce Fraser, who claims that it includes most of the colors in the SWOP CMYK gamut. The R and B used in the Bruce RGB and Adobe RGB color-space profiles match.
NTSC (1953): NKNTSC.icm (Windows)/Nikon NTSC (1953) 4.0.0 (Mac OS)
This is the color space for video defined by the National Television Standards Committee (NTSC) in 1953 and used in early color televisions. This color space is also used in some Far-East newspaper and printing organizations. The corresponding RGB setting in Adobe Photoshop is «NTSC (1953)».
Adobe RGB (1998): NKAdobe.icm (Windows)/Nikon Adobe RGB (1998) 4.0.0 (Mac OS)
A color-space profile defined in Adobe Photoshop 5.0. It has a wider gamut than sRGB and includes the colors found in most CMYK gamuts, making it suitable for users involved in desktop publishing. The corresponding RGB setting in Adobe Photoshop 5.0 is «SMPTE-240M,» the corresponding setting in Adobe Photoshop 5.5 or later «Adobe RGB (1998)».
CIE RGB: NKCIE.icm (Windows)/Nikon CIE RGB 4.0.0 (Mac OS)
A video color-space profile established by the Commission Internationale de l’Éclairage (CIE). While it boasts a fairly wide gamut, it suffers from the drawback that the area devoted to the reproduction of cyan is relatively small. The corresponding RGB setting in Adobe Photoshop is «CIE RGB».
Adobe Wide RGB: NKWide.icm (Windows)/Nikon Adobe Wide RGB 4.0.0 (Mac OS)
This color-space profile, designed by Adobe, incorporates most of the visible colors. This however has the consequence that most of the colors it can express can not be reproduced on standard monitors and printers. The corresponding RGB setting in Adobe Photoshop 5.0 or later is «Adobe Wide RGB».
The gamut of colors that can be expressed in the above color-space profiles is shown in the following chromaticity (x, y) graph. The greater the area enclosed by the triangle that represents the color-space profile, the wider its gamut.

Изменения, внесенные в версию 2.0.2
Изменения в версиях для ОС Windows и Mac
- Добавлена поддержка фотокамеры D5500.
- Появилась возможность поворачивать изображения в режиме просмотра.
Дополнительные изменения в версии для ОС Mac
- Добавлена поддержка ОС OS X версии 10.10.1.
- Прекращена поддержка ОС OS X версии 10.7.5.
Примечания
- Файлы в формате NEF, полученные с помощью цифровых фотокамер Nikon, можно использовать для предварительного просмотра изображений, отображаемых в данном программном обеспечении. Однако данная возможность не поддерживается для файлов в формате NEF, снятых с помощью фотокамер COOLPIX 8800, 8700, 8400, 5700, 5400 и 5000.
- При создании пользовательского режима Picture Control используйте в качестве образца изображение в формате RAW, снятое с помощью фотокамеры, на которой будет применяться этот режим. Если использовать изображение в формате RAW, созданное с помощью другой фотокамеры, характеристики воспроизведения цвета на образце и изображениях, снятых в пользовательском режиме Picture Control, могут отличаться.
- При загрузке пользовательских кривых с 21 или более точками, созданных в предыдущих версиях приложений, будут загружены только первые 20 точек, начиная с точки белого.
- Только ОС WindowsЕсли для пользовательских кривых были указаны значения точки белого, точки черного и точки полутона, но при этом до их отображения на кривой был изменен другой параметр, заданные настройки могут быть отменены.
- Только MacУстановка на устройствах под управлением ОС OS X версии 10.10 YosemiteПри установке на компьютере Mac с ОС OS X версии 10.10 Yosemite приложение (значок) Picture Control Utility 2 может не отображаться на док-панели. В этом случае значок приложения можно добавить на док-панель вручную.
Selecting a Picture Control
Choose a Picture Control according to the subject or type of scene.
- nAuto
- The camera automatically adjusts hues and tones based on the Standard Picture Control. The complexions of portrait subjects will appear softer, and such elements as the foliage and sky in outdoor shots more vivid, than in pictures taken with the Standard Picture Control.
- QStandard
- Standard processing for balanced results. Recommended for most situations.
- RNeutral
- Minimal processing for natural results. Choose for photographs that will later be processed or retouched.
- SVivid
- Pictures are enhanced for a vivid, photoprint effect. Choose for photographs that emphasize primary colors.
- TMonochrome
- Take monochrome photographs.
- oPortrait
- Process portraits for skin with natural texture and a rounded feel.
- pLandscape
- Produces vibrant landscapes and cityscapes.
- qFlat
- Details are preserved over a wide tone range, from highlights to shadows. Choose for photographs that will later be extensively processed or retouched.
-
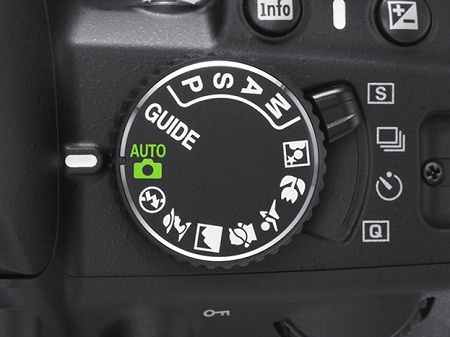
Press L (Z/Q).
A list of Picture Controls will be displayed.
L (Z/Q) button
-
Select a Picture Control.
Highlight the desired Picture Control and press J.
Custom Picture Controls
Custom Picture Controls are created through modifications to existing Picture Controls using the Manage Picture Control option in the photo or movie shooting menu ( Manage Picture Control, Manage Picture Control). Custom Picture Controls can be saved to a memory card for sharing among other cameras of the same model and compatible software.
The Picture Control Indicator
The current Picture Control is shown in the information display when the R button is pressed.

The Shooting Menus
Picture Controls can also be selected using the Set Picture Control option in the photo or movie shooting menu ( Set Picture Control, Set Picture Control).
Color Reproduction Process
Choose from the options below. The Picture Controls available vary with the option selected; if the current picture was taken with a camera that supports only the most recent Picture Controls, only Camera compatible will be available.

- Latest Picture Control
- Colors are processed using the latest Picture Controls. The most recently-added Creative Picture Controls and parameters can be applied to pictures taken with cameras that do not offer these options.
- Camera compatible
- Colors are processed using the Picture Controls for the camera that took the picture. Choose this option for color reproduction that matches the look seen in the camera monitor.
Изменение режимов Picture Control
Существующие предустановки или пользовательские Picture Control ( ) можно изменить в соответствии с сюжетом или творческим замыслом пользователя. Выберите сбалансированное сочетание настроек при помощи Быстрая настройка или отрегулируйте индивидуальные настройки вручную.
-
Выберите Picture Control.
Выделите нужный Picture Control в списке Picture Control ( ) и нажмите 2.
-
Отрегулируйте настройки.
Нажмите 1 или 3, чтобы выделить нужный параметр, и нажмите 4 или 2, чтобы выбрать значение с шагом 1, или поверните вспомогательный диск управления, чтобы выбрать значение с шагом 0,25 ( ; доступные параметры отличаются в зависимости от выбранного режима Picture Control). Повторяйте этот шаг до тех пор, пока не будут отрегулированы все настройки, или выберите предустановленную комбинацию настроек, выделив Быстрая настройка и нажав 4 или 2. Для восстановления значений по умолчанию нажмите кнопку O (Q).
-
Нажмите J.
Изменение исходных Picture Control
Режимы Picture Control, созданные в результате модификаций настроек по умолчанию, обозначаются звездочкой («E»).

Настройки Picture Control
Быстрая настройка
Отключите или повысьте эффект выбранного Picture Control (обратите внимание, что при этом происходит сброс всех ручных настроек). Недоступно с пользовательскими Picture Control ( )
Ручные настройки
- Повышение резкости
- Управление резкостью контуров. Выберите A для автоматической регулировки повышения резкости в соответствии с типом сюжета.
- Четкость
- Отрегулируйте четкость вручную или выберите A, чтобы фотокамера настроила четкость автоматически. В зависимости от сюжета вокруг ярких объектов могут появляться тени, или вокруг темных объектов могут появляться ореолы при некоторых настройках. Четкость не применяется к видеороликам.
- Контраст
- Отрегулируйте контраст вручную или выберите A, чтобы фотокамера отрегулировала контраст автоматически.
- Яркость
- Увеличьте или уменьшите яркость без потери деталей в светлых или затененных участках.
- Насыщенность
- Управление насыщенностью цветов. Выберите A для автоматической регулировки насыщенности в соответствии с типом сюжета.
- Оттенок
- Отрегулируйте оттенок.
- Эффекты фильтра
- Имитация эффекта цветных фильтров на монохромных фотографиях ( ).
- Тонирование
- Выберите оттенок, который используется на монохромных фотографиях ( ).
«n Авто» Picture Control
Если выбран параметр n Авто для Режим Picture Control, настройки можно отрегулировать в диапазоне от A-2 до A+2. Вращение вспомогательного диска управления не имеет эффекта.

«A» (Авто)
Результаты автоматического повышения резкости, четкости, контраста и насыщенности будут изменяться в зависимости от экспозиции и положения объекта в кадре. Для лучших результатов используйте объектив типа G, E или D.
Переключение между ручными и автоматическими настройками
Нажмите кнопку X (T) для переключения между ручными и автоматическими настройками (A) для повышения резкости, четкости, контраста и насыщенности.

Предыдущие настройки
Индикатор j под значением в меню настроек Picture Control показывает предыдущее значение данной настройки. Этими сведениями следует руководствоваться при регулировке настроек.

Эффекты фильтра (только для режима «Монохромный»)
Параметры данного меню предназначены для имитации эффектов цветных фильтров на монохромных фотографиях. Доступны следующие эффекты фильтров:
| Параметр | Описание | |
|---|---|---|
| Y | Желтый | Усиливает контраст. Может применяться для уменьшения яркости неба при съемке пейзажей. Оранжевый фильтр повышает контраст сильнее, чем желтый, красный – сильнее, чем оранжевый. |
| O | Оранжевый | |
| R | Красный | |
| G | Зеленый | Смягчает оттенки кожи. Может применяться при съемке портретов. |
Тонирование (только для режима «Монохромный»)
При нажатии 3, когда выбрано Тонирование, отображаются параметры насыщенности. Для настройки насыщенности нажмите 4 или 2. При выборе B&W (черно-белый) управление насыщенностью недоступно.

Nikon Picture Control Utility 2.1.0 Software Downloads
Operating System (s) : Windows 8.1(32-bit, 64-bit), Windows 7 SP1(32-bit, 64-bit)
- Picture Control Utility 2.1.0 Win 8.1 Software – Download (105.54MB)
- Picture Control Utility 2.1.0 Win 7 Software – Download (105.99MB)
Description: Picture Control Utility 2.1.0 is software that allows users to adjust and manage Picture Controls – Nikon’s exclusive function for specifying imaging characteristics. With this utility, users can use NEF RAW images they have captured to create custom Picture Controls that achieve the characteristics they prefer or intend.Custom Picture Controls that have been created in this software can be saved to a memory card for loading into a camera, or created and altered in the camera then imported into the software for editing.Picture Controls that have been imported into the Picture Control Utility 2.1.0 can then be readjusted and used with ViewNX 2 and Capture NX-D.
Picture Control Utility 2.1.0 may be launched from ViewNX 2 or Capture NX-D for collaberation with these software applications, or installed and launched as a separate application for easier collaberation with cameras.
Supported digital cameras: D4-series cameras, D3-series cameras, Df, D810, D800-series cameras, D750, D700, D610, D600, D300-series cameras, D7200, D7100, D7000, D5500, D5300, D5200, D5100, D5000, D90, Nikon 1 series, COOLPIX A, Digital cameras supporting Custom Picture Control files with the “NP2” extension, D810,D750,D7200,D5500.
Note/Modifications enabled with Picture Control Utility Ver.2.1.0: Support for the D7200 has been added, Windows Vista is no longer supported.
Picture Control Utility 2.1.0 software installation instructions for Windows:
- Create a new folder with an appropriate name on your computer’s hard disk.
- Download S-PCU2__-020100WF-ALLIN-ALL___.exe to the folder created in step 1.
- Run S-PCU2__-020100WF-ALLIN-ALL___.exe to launch the software installer.
- Follow the on-screen instructions to accurately complete the installation.
Picture Control Utility 2.1.0 software installation instructions for Macintosh:
- Download S-PCU2__-020100MF-ALLIN-ALL___.dmg.
- Double-click the S-PCU2__-020100MF-ALLIN-ALL___.dmg icon to mount the disk image titled S-PCU2__-020100MF-ALLIN-ALL___. A file titled Welcome will be created inside the disk image.
- Run Welcome to launch the software installer.
- Follow the on-screen instructions to accurately complete the installation.
Operating System (s) : Mac OS 10.8.5, Mac OS 10.9.5 , Mac OS 10.10.2
Picture Control Utility 2.1.0 Mac Software – Download (46.66MB).
Modifying Picture Controls
Existing preset or custom Picture Controls ( ) can be modified to suit the scene or the user’s creative intent. Choose a balanced combination of settings using Quick adjust, or make manual adjustments to individual settings.
-
Select a Picture Control.
Highlight the desired Picture Control in the Picture Control list ( ) and press 2.
-
Adjust settings.
Press 1 or 3 to highlight the desired setting and press 4 or 2 to choose a value in increments of 1, or rotate the sub-command dial to choose a value in increments of 0.25 ( ; the options available vary with the Picture Control selected). Repeat this step until all settings have been adjusted, or select a preset combination of settings by highlighting Quick adjust and pressing 4 or 2. Default settings can be restored by pressing the O (Q) button.
-
Press J.
Modifications to Original Picture Controls
Picture Controls that have been modified from default settings are indicated by an asterisk (“U”) in the Set Picture Control menu.

Picture Control Settings
Quick adjust
Mute or heighten the effect of the selected Picture Control (note that this resets all manual adjustments). Not available with custom Picture Controls ( ).
Manual adjustments
- Sharpening
- Control the sharpness of outlines. Select A to adjust sharpening automatically according to the type of scene.
- Clarity
- Adjust clarity manually or select A to let the camera adjust clarity automatically. Depending on the scene, shadows may appear around bright objects or halos may appear around dark objects at some settings. Clarity is not applied to movies.
- Contrast
- Adjust contrast manually or select A to let the camera adjust contrast automatically.
- Brightness
- Raise or lower brightness without loss of detail in highlights or shadows.
- Saturation
- Control the vividness of colors. Select A to adjust saturation automatically according to the type of scene.
- Hue
- Adjust hue.
- Filter effects
- Simulate the effect of color filters on monochrome photographs ( ).
- Toning
- Choose the tint used in monochrome photographs ( ).
The “n Auto” Picture Control
If n Auto is selected for Set Picture Control, settings can be adjusted in the range A-2 to A+2. Rotating the sub-command dial has no effect.

“A” (Auto)
Results for auto sharpening, clarity, contrast, and saturation vary with exposure and the position of the subject in the frame. Use a type G, E, or D lens for best results.
Switching Between Manual and Auto
Press the X button to switch back and forth between manual and auto (A) settings for sharpening, clarity, contrast, and saturation.

Previous Settings
The j indicator under the value display in the Picture Control setting menu indicates the previous value for the setting. Use this as a reference when adjusting settings.

Filter Effects (Monochrome Only)
The options in this menu simulate the effect of color filters on monochrome photographs. The following filter effects are available:
| Option | Description | |
|---|---|---|
| Y | Yellow | Enhances contrast. Can be used to tone down the brightness of the sky in landscape photographs. Orange produces more contrast than yellow, red more contrast than orange. |
| O | Orange | |
| R | Red | |
| G | Green | Softens skin tones. Can be used for portraits. |
Toning (Monochrome Only)
Pressing 3 when Toning is selected displays saturation options. Press 4 or 2 to adjust saturation. Saturation control is not available when B&W (black-and-white) is selected.

Touch Controls
Tapping the indicator displays touch controls that can be used to adjust Picture Control settings.

Picture Control Parameters
After choosing a , choose a Picture Control and adjust Picture Control parameters. The parameters available vary with the camera used and the color reproduction process and Picture Control selected.
Recent Picture Controls
- The parameters below are available when Latest picture control is chosen as the color reproduction process or if the picture was taken with a camera that supports only the most recent Picture Controls and only Camera compatible can be selected. Fine-tune settings using the sliders or select Auto to let Capture NX-D adjust settings automatically (note that Auto produces results that may vary with exposure and the position and size of the subject in the frame).
- Quick sharp
- Quickly adjust levels for balanced Sharpening, Mid-range sharpening, and Clarity, or select Auto to let the camera adjust sharpening automatically. Except when Auto is selected, you can also make manual adjustments to the following individual parameters:
◆ Sharpening: Control the sharpness of details and outlines.
◆ Mid-range sharpening: Adjust sharpness according to the fineness of the patterns and lines in mid-tones affected by Sharpening and Clarity.
◆ Clarity: Adjust overall sharpness and the sharpness of thicker outlines without affecting brightness or dynamic range.
- Contrast
- Adjust contrast. Choose lower values for less contrast, higher values for more contrast.
- Brightness
- Adjust brightness without losing detail in highlights and shadows.
- Saturation
- Control the vividness of colors. Choose lower values for less saturation, higher values for more saturation. This option is not available with the Monochrome Picture Control.
- Hue
- Adjust hue. This option is not available with the Monochrome Picture Control.
- Filter Effect
- Simulate the effects of color filters when using the Monochrome, Sepia, Blue, Red, or Pink Picture Control.
- Toning
- Choose a tint when using the Monochrome Picture Control.
- Adjust Saturation
- Choose the saturation of the tint used with the Monochrome, Charcoal, Graphite, Binary, and Carbon Picture Controls. Does not apply to black-and-white images.
Click Reset to reset all sliders. Note that Contrast and Brightness can not be adjusted for Picture Controls that use a custom curve.
Creative Picture Controls
An Effect level slider is displayed when a Creative Picture Control such as Dream, Morning, or Pop is selected. Use the slider to choose the effect level.
Earlier Picture Controls
If the color reproduction menu offers a choice between Latest picture control and Camera compatible, the parameters listed below will be available when Camera compatible is selected. Fine-tune settings using the sliders or select Auto to let Capture NX‑D adjust settings automatically (note that Auto produces results that may vary with exposure and the position and size of the subject in the frame).
- Quick adjust
- Drag the slider left or right to mute or heighten the effect of the selected Picture Control. Quick adjust affects all Picture Control settings simultaneously and cancels any changes made separately to the individual parameters. It is not available with neutral, flat, or monochrome Picture Controls.
- Sharpening
- Control the sharpness of outlines. Choose higher values for more sharpening.
- Clarity
- Adjust clarity (this option is available only with pictures taken using cameras that support the Clarity parameter).
- Contrast
- Adjust contrast. Choose lower values for less contrast, higher values for more contrast.
- Brightness
- Adjust brightness without losing detail in highlights and shadows.
- Saturation (non-monochrome only)
- Control the vividness of colors. Choose lower values for less saturation, higher values for more saturation.
- Hue (non-monochrome only)
- Adjust hue.
- Filter Effect (monochrome only)
- Simulate the effects of color filters on monochrome photographs.
- Toning (monochrome only)
- Choose the tint used in monochrome photographs.
- Adjust Saturation (monochrome only)
- Choose the saturation of the tint used in monochrome pictures. Does not apply to black-and-white images.
Click Reset to reset all sliders. Note that Contrast and Brightness can not be adjusted for Picture Controls that use a custom curve.
The “AUTO” Picture Control
The parameters for the AUTO Picture Control can be set values of from A−2 to A+2.