The Psychology of Creative PhotographyHigh Key vs Low Key Lighting Whats the Difference
Содержание
- Awesome External High Key Tutorials
- Ссылки
- Варианты освещения для создания фотографий в высоком ключе
- Window Light In High Key Photography
- Технология
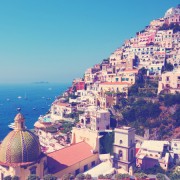
- High Key In Landscape Photography
- История
- Why Use High Key Lighting
- What is High Key and Low Key Photography
- High key and low key lighting can create drastic differences in the final look of your film. Lets take a look at which is best for your next shoot.
- High Key Photography Editing
- Приемы для получения фотоснимков в высоком ключе
- High Key Subjects
- Lighting Setup
- Техники выполнения
- Lighting Equipment For High Key Photography
- Camera Settings
- What Is High Key Photography
Awesome External High Key Tutorials
In case all this wasn’t enough, we’d like to share a few handy resources on high key photography:
- High Key Studio Lighting for Small Spaces – Not everyone has a huge space to take their portraits. With this tutorial, learn how you can create the perfect lighting for high key portraits in a limited space.
- Black and White High Key in Photoshop – If you have a great image already that you’d like to convert to a high key black and white, this tutorial will show just how to do it.
- How to Edit High Key Photos – Post-processing workflow for high key images. This particular lesson is a video tutorial using Adobe Lightroom.
- Stunning High Key Portrait Tutorial – Many times, high key photography washes out the detail and gorgeous texture of an image. Learn how to preserve or add them in here.
- High Key Photography – Setup and Lighting for the Perfect Shoot (Video) – This is a quick video tutorial detailing the equipment, setup, and lighting for a basic DIY high key studio.
- High Key Photography Anywhere (Video) – How to create a studio photograph no matter where you happen to be. Very useful for those photos “ruined” by the background!
- Create High key photos in Adobe Lightroom – Turn a decent image into a professional-quality high key photo very easily. This is another tutorial in Lightroom.
- Setting up Lightroom Presets for High Key – Yet another Lightroom tutorial. This time, learn how to make the high key post-process workflow easier by setting high key presets.
- High Key Camera Techniques – How to create high key photos the easy way – by starting with your camera. Learn some basic techniques to get great base images before worrying about post-processing.
These tutorials will give you a great starting place for creating the perfect high key images in almost any situation. If you think we have missed any good tutorials on high key photography, then feel free to post a link to them below.
Ссылки
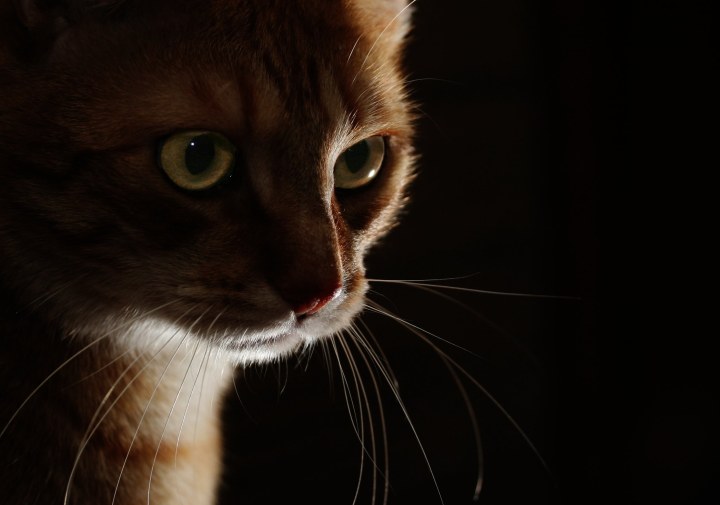
Портре́т в тёмной тона́льности (Ни́зкий ключ англ. Low-key lighting) — разновидность графической техники в искусстве (изобразительное искусство, фотография, кинематограф), применяемая для художественного выражения автора, спецэффектов или в технических целях, характерной особенностью которой является незначительная контрастность тёмных тонов и полное отсутствие или незначительное присутствие светлых тонов на изображении. Требуемый эффект может достигаться во время съёмки, при проявке или печати, а также обработке в графическом редакторе. При этом изображение в низком ключе является противоположностью снятого в высоком ключе
Его также важно не путать с высококонтрастными снимками, где присутствуют только крайние проявления цветовых тонов, как очень светлых, так и очень тёмных, с крайне небольшим количеством промежуточных
Телецкое сельское поселение — муниципальное образование в центральной и южной части Трубчевского района Брянской области. Административный центр — деревня Телец.
Образовано в результате проведения муниципальной реформы в 2005 году, в границах Телецкого и Филипповичского сельсоветов.Территория сельского поселения прилегает к государственной границе России; здесь действует режим пограничной зоны.
Трубче́вский райо́н — административно-территориальная единица (район) и муниципальное образование (муниципальный район) в Брянской области России.
Административный центр — город Трубчевск.
| Жанры | |
|---|---|
| Типы фотоаппаратов | |
| Термины | |
| Производители | |
| Техника | |
|
Варианты освещения для создания фотографий в высоком ключе
Для получения фотографий в этом направлении используют следующие типы освещения:
- Постоянное (непрерывное).
- Импульсное.
Если вам необходим непрерывное освещение, вы можете остановить свой выбор на вольфрамовых лампах, которые излучают теплый свет или флуоресцентных лампах холодного света. Вольфрамовые лампы отличаются тем, что они нагреваются и излучают более теплый свет. Флуоресцентные в свою очередь не греются и воспроизводят свет, который больше напоминает естественное дневное освещение.
Основной недостаток ламп непрерывного света заключается в том, что они обладают небольшой мощностью, это препятствует получению качественных изображений в высоком ключе.
При фотосъемке можно также использовать импульсные источники света. Они более универсальные и обладают высокой мощностью, поэтому многие фотохудожники, специализирующиеся на студийной съемке, применяют только их.
Для получения фотоснимков в высоком ключе хорошего качества необходимо найти баланс сочетания освещенного фона с объектом съемки. Сделать это довольно сложно, такой навык требует определенной практики и хорошей аппаратуры. Но если освоить это умение в результате можно получить запоминающиеся и красивые художественные снимки.
Вы участвуете в этих фотоконкурсах?
|
Начало: 19-09-2019 Тема: осенняя фотосессия Жанр: портрет |
|
Начало: 21-08-2019 Тема: памятники Жанр: архитектурная фотография |
Интересные публикации на сайте
|
Физической базой фотопроцесса признается запечатление изображений при помощи химических и физических процессов, осуществляемых под воздействием освещения в световосприимчивой фотоэмульсии или фотоэлек… |
|
Фотографией в высоком ключе считается портретный снимок на белом или специально выбеленном фоне. Яркий и привлекательный белоснежный фон на фото всегда обладает необыкновенной позитивной энергией. Исп… |
Новые фотоконкурсы на сайте
|
Начало: 14-10-2019 Тема: осенний макромир Жанр: макрофотография |
|
Начало: 18-09-2019 Тема: панорама Жанр: панорамная фотография |
Window Light In High Key Photography
In case the studio setup seems to be too complicated or not affordable for you, you can create high key images differently. For instance, you can use window light and alter it with a reflector or fill-flash. This type of high key photography is quite popular and gives superb results. Portrait and wedding photographers often take advantage of this style because it can be achieved with minimum lighting equipment. You need to overexpose the background and light the subject with fill lighting.
You can shoot high key photography outdoors too – the best way to do this is to get a solid background, white or yellow, and bring it to a place with lots of indirect light. A simple white sheet placed in the shade will work perfectly as your background.

Технология

Высококонтрастный снимок, не относящийся к высокому ключу
Светочувствительные материалы и в электрические сигналы обладают ограниченной и способны воспроизвести относительно узкий диапазон яркостей объекта съёмки. Для достижения нужного результата или перед началом съёмки должен чётко представлять вид будущего изображения и его тональность. При анализе снимаемой сцены необходимо определить, какие являются наиболее важными, чтобы принять решение о точке отсчёта при измерении .
Любой снимаемый сюжет состоит из участков с различной яркостью, благодаря отличиям в отражательной способности разных объектов съёмки и рисунку от съёмочного освещения. Для правильного отображения всех участков снимаемой сцены необходимо точное дозирование количества света, получаемого светоприёмником. должна быть такой величины, чтобы позволить фотоматериалу с определённой получить количество света, необходимое для воспроизведения максимального диапазона сюжетно важных яркостей в пределах доступной шкалы. Светочувствительность — это характеристика любого светочувствительного элемента. Чем больше (фотоплёнки, ), тем меньшая требуется .

18 %
Обычно главным критерием при измерении яркости света, отражённого от объектов съёмки, считается правильность отображения тона человеческой , главным образом, лица. Поэтому, все экспонометрические устройства таким образом, чтобы отображать корректный результат при измерении света, отражённого от кожи людей европейской расы. В некоторых случаях в качестве тест-объекта может служить с калиброванной отражательной способностью в 18 %. Такой серый цвет является точкой отсчёта для определения тональности, в фотографии он именуется middle key и считается стыком между 5 и 6 зонами . Нормальная экспозиция кадра хорошо прорабатывает 2 ступени (зоны экспозиции) вверх плюс чисто-белый цвет и 3 ступени вниз плюс чисто-чёрный цвет.
Слишком большая экспозиция (передержка) приводит к получению изображения с отсутствующими деталями в светлых местах (), а иногда и полному отсутствию изображения, что, например, в фотожурналистике обычно считается браком. Однако умеренная передержка (смещение Ключа в светлую сторону) позволяет получить изображение в высоком ключе. При недодержке можно получить обратный эффект — изображение в стиле низкого ключа.
Изображение считается выполненным в высоком ключе, если его тональное решение соответствует условию, что тёмные участки изображения не выходят за пределы второй светло-серой ступени семиступенчатой шкалы плотностей Семиступенчатая шкала строится на основе 10-ступенчатой путём вычленения пяти ступеней освещения, что соответствует оптимальному визуальному контрасту, и переводом (сжатием) остальных ступеней в чисто-чёрную и чисто-белую зоны.
- * Римскими цифрами обозначены градации серого, 0 соответствует уровню :
| I | II | III | IV | V | VI | VII | VIII | IX | X |
| I | II | III | IV | V | VI | VII |
Применительно к цифровой технике ступень светло-серого располагается в диапазоне значений яркости 64-128 по линейной шкале. Данное вытекает из : переход от одной ступени к другой соответствует одной ступени экспозиции (то есть изменению её в 2 раза) и свойств геометрической прогрессии: последовательность чисел (a1, a2,…, an…), из которых каждое равно предыдущему, умноженному на постоянное для данной прогрессии число q (знаменатель Г. п.).
Самое светлое значение 0-й ступени — 1 (постоянный знаменатель прогрессии 2);
1-й ступени 1*2=2;
2-й ступени 2*2=4 (1*2 во второй степени);
3-й — 4*2=8 (1*2 во третьей степени);
4-й — 8*2=16(1*2 в четвёртой степени);
5-й — 16*2 =32(1*2 в пятой степени);
6-й — 32*2=64(1*2 в шестой степени);
7-й — 64*2=128(1*2 в седьмой степени);
8-й 128*2=256(1*2 в восьмой степени)
High Key In Landscape Photography
As you already know, high key images are relatively easy to achieve in an environment where you have full control of the lighting. This means that being able to make high key shots of landscapes is a serious challenge. You have to work with the available light, have an eye for landscapes that will look good in high key, and then use your camera settings to get the best shot you can.
High key landscapes can be very poetic, and they usually work best in black and white. However, they can sometimes work well in color, especially if you decide to desaturate colors in editing.
If you’re experienced in shooting long exposure landscapes and you already own a neutral density filter, you can make amazing high key landscapes by shooting lakes or other large bodies of water. You will need a very long exposure (usually more than 20 seconds) to give the water the snow-like appearance!

Other great environments for high key landscapes are deserts and snowstorms. Check out these gorgeous examples:


История

в высоком ключе
Название техники происходит от самого процесса съёмки. При съёмке в High Key (Светлой тональности) КЛЮЧ фотографии (Серая карта) на изображении смещается в светлую (высокую) сторону; именно это и дало название технике. Аналогично при съёмке в технике Low Key — КЛЮЧ смещается в низкую (тёмную) сторону. Существует ошибочное мнение, что название происходит от понятия ( key light, досл. «ключевой свет»), однако данная позиция не выдерживает никакой критики. Фотографию в технике High Key Можно снять как с рисующим светом — светотеневая фотография, так исключительно на заполняющем свете — светотональная фотография. При съёмке в светотональном режиме рисующий свет может отсутствовать полностью. Заблуждение по этому вопросу возникло из-за того, что понятия High Key существует и в кинематографе и оно отличается в корне от понятия в фотографии, хотя и имеет одинаковое название
Особенностью съёмки в High Key является большое количество света необходимое для смещения КЛЮЧА фотографии в светлую сторону . В этом случае компенсирующий свет — предназначенный для сглаживания теней тоже необходимо увеличивать и в результате получаются снимки.
В советской фотошколе, последователями которой являются преподаватели фотографии операторского факультета и Курский Леонид Дмитриевич, считают, что при съёмке в светлой тональности в кадре не должно быть темнее светло-серого. Однако в зарубежных фотошколах и в современной российской таких жёстких ограничений нет.
До конца 20 века для создания требуемого эффекта при фотографировании использовались несколько , которые устанавливались вокруг лица фотографируемого. Со временем стали использоваться люминесцентные лампы, создающие аналогичный эффект, но потребляющие меньше энергии и не греющиеся.
Why Use High Key Lighting
High key lighting produces a pleasant outcome. Various advertisers often prefer this style of photography to help present their products in the best possible way. Even comedy shows use this type of lighting set up because it provides an upbeat atmosphere which has an immediate effect on the audience.
Eliminating shadows from photos presents the subject in a pleasing manner – such photos convey little to no drama. On the other hand, hard-edged shadows of low key photography creates the opposite feelings. If you want a rather moody and ominous scene, you should avoid high key lighting.
There are two main approaches to creating high key photos:
- Light, expose and shoot the photo with high key results in mind from the very beginning
- Rework the photo in editing so that it matches the high key style
Amateur and professional photographers use both of these approaches. However, it might be more convenient to use the first approach, especially if you’re not proficient in post-production. We’ll guide you through the entire process of shooting high key images so that you won’t have to rework the photos too much in Lightroom and Photoshop.

What is High Key and Low Key Photography
By Discovery Center Team Photo art, inspiration, Photo, photography, photos
High Key and Low Key photography make use of lighting and contrast (or lack thereof) to create a specific mood. Originally high key photography emerged as a solution for screens that could not correctly display high contrast ratios. Today capturing high key photos, like low key photos, is a stylistic choice in photography.
When capturing a high key photo, there are a number of factors you need to consider, especially if you are absolutely trying to achieve that classic studio look. For starters, you will have to make sure you have the right equipment for the job, including lighting and a backdrop. You could take advantage of outdoor lighting, but let’s face it – there’s only so much you can control when it comes to the weather. Finally, you will also have to consider camera settings and lighting set up to capture those images. Like high key photos, low key photos are also the product of lighting manipulation and contrast. Though the resources required for capturing low key shots are less extensive – one light source compared to the four required for high key photos for example – it takes just as much skill and patience to achieve.
Deciding which style to choose for your photos all comes down to atmosphere as both are powerful tools for creating certain moods.

With high key photography, multiple powerful sources of lighting are strategically positioned to eliminate harsh shadows from images, giving them a very light and optimistic feel. Components of the image with rich colors stand out and areas with lighter color wash out, almost to a white. High key is an excellent choice for both color and black and white photos.
With low key photography, lighting is reduced in order to produce images characterized by striking contrasts, dark tones, and shadows. Usually, a single source of lighting is used to achieve this composition. As a result, low key images often have a rather dark dramatic quality to them. Like high key, low key is a great choice for both color and black and white photos.
So why not try your hand at creating these beautiful and intense images at home, and don’t forget to show us how they turn out on our Facebook page. We might even ask to feature your work on the site! We’ve also made a script for PaintShop Pro just in case you don’t have the lighting equipment on hand. Dramatic transformations are just a few clicks away with our High Key/Low Key scripts!
High key and low key lighting can create drastic differences in the final look of your film. Lets take a look at which is best for your next shoot.
Cover image via Shutterstock.
Two primary lighting styles that you will consistently find in cinematography are high key and low key lighting. Each style offers its own advantages, so let’s break down the uses for each.
High Key Lighting
High key lighting is a method often used in beauty and makeup commercials and in comedies. A high key look gives you fewer shadows and makes your talent look flawless and elegant. It produces an even amount of light that spreads across an entire scene. It’s also useful for producing food or product imagery when you need the light to be even across the entire scene.
A high key lighting style often involves a soft key light directly above the camera — and not too close to the talent. Positioning the light directly in front of the talent creates less shadow, making the skin look softer and smoother. Usually, these lights will be large — at least a 6×6 butterfly. High key lighting also produces a beautiful catch light in the talent’s eyes.
Another reason high key is useful in the beauty industry is because the light is further away. As a result there is less light falloff, making the transition from highlight to shadow much smoother and less abrupt. This makes the lighting much more consistent from five feet and also ten feet away. A high key situation is ideal for shots with two subjects in frame because it ensures that each subject gets lit evenly and casts fewer shadows.
https://youtube.com/watch?v=Rkhu_g7GyLU
Low Key Lighting
As opposed to high key lighting, low key lighting is much more dramatic. Low key lighting typically involves lots of contrast and creates an entirely different mood than high key lighting. Low key’s transition from highlight to shadow is much quicker and more dramatic — and harsh. Usually low key lighting is very close to a subject, and the light source is typically dimmer to accommodate this. In fact, in some cases, you can light someone on a white backdrop, but it will appear black because of how close the light is to a subject.
By placing the light closer to the subject, the transition from highlight to shadow occurs much faster, creating a much more dramatic scene.
The lighting style you choose for your film can create a unique look. A high key style may help the humor in your comedy thrive. A low key lighting style may convey your drama’s story by putting the audience in the right mood. Essentially, lighting styles should help move the story along, so they should work with your story, not against it.
Looking for more on lighting? Check out these articles.
- Learn How to Enhance Your Film with Ambient Light
- Three Ways To Light A Tent Scene On a Low Budget
- Three Ways To Light A Tent Scene On a Low Budget
- How to Shoot Interior Locations with Limited Lighting
- Lighting Different Times of Day
High Key Photography Editing
High key images certainly won’t be perfect straight out of the camera – they require editing and fine-tuning even more than regular photographs. Editing in high key photography can be used to clean up problem areas and lighten up and even out the background. You’ll notice that it’s quite hard to get a perfectly even background, especially if you’re not using professional lighting.
When you import your high key photographs into Lightroom for post-processing, you might notice that you didn’t overexpose them enough or that you simply couldn’t remove certain lines or textures you wanted to eliminate. To fix such issues, increase the exposure and lighten the shadows even more, but don’t blow out the highlights.
Be aware that composition matters a lot in high key photography. Using a lot of negative space will help your subject stand out in a rather simple and clean way, which is perfect for product photography. In case you didn’t think about negative space while shooting, you can go through the image in Photoshop and paint in white where you think blank spaces should be. It’s quite easy to do so – you just need to open your image in Photoshop and create a new layer to paint on. After you’ve done that, select the paintbrush tool and white as your paint color. Adjust the opacity, flow and hardness of your brush as needed.

If you’re a Lightroom user, you can achieve a similar effect with the adjustment brush. In the develop module, select the adjustment brush tool and then the exposure effect from the dropdown “Effect” menu. You should increase the brush exposure all the way up and start painting over the areas you want to fix. In case you’re not satisfied with the result, you can create another brush and paint over the problematic areas again.

Приемы для получения фотоснимков в высоком ключе
Фотографии, сделанные в этом стиле отличаются позитивной тональностью. Такой способ хорош для фотосъемки занятного, веселого и яркого объекта.
Выполнить хороший фотоснимок в этом стиле в помещении нелегко, особенно если у фотографа отсутствует специальное оборудование. В этом случае съемка на открытом воздухе в солнечный день будет легче и дешевле. Для получения фото на белоснежном фоне в студии понадобятся особая осветительная аппаратура.
Если в процессе фотографирования света будет недостаточно, белый фон может выглядеть не светлым, а наоборот, серым.
С целью получения светлого фона мастера используют еще один интересный прием: они применяют внешнюю вспышку. Способ дает довольно хорошие результаты. Так, можно отвести объект съемки от заднего фона на некоторое расстояние и установить за ним вспышку, чтобы свет был направлен на фон. Подобный прем позволяет получить качественный белый фон.
High Key Subjects
Choosing the proper subject for high key photography can be a little bit tricky, and it requires some practice. For instance, it can be challenging to capture an outdoor adventure scene or a beautiful sunset using the high key technique. The same goes for portraiture – there are people who simply don’t look interesting or attractive when shot in high key.
The best way to practice this type of photography is to start shooting subjects that tend to look good in high key. Plants are definitely one of them – anything with leaves, flowers, or roots will look amazing in high key if appropriately shot.
Check out these great examples of high key photography of plants:


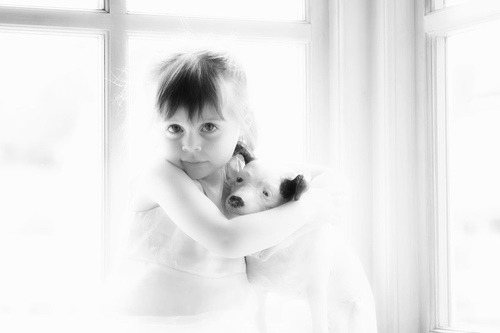
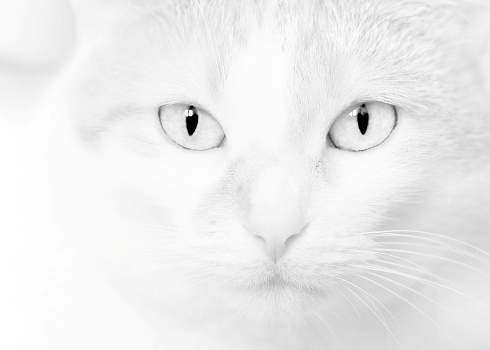
Another great subject for high key images are babies and young animals because this style of photography enhances their pure and fragile beauty. Here are a few examples:


Wedding and fashion sessions can also benefit from a high key approach, especially when they are shot in minimalist surroundings. Pay attention to the simple yet radiant beauty of the following images:


Bear in mind that one of the most difficult things to do in high key photography is to separate your subjects and single them out as the main idea of your photo. In case you’re not using a simple white background, you will most probably have to move around a lot. Try various perspectives and ideas to single out the subjects of the photo creatively. This can require a lot of effort, sometimes, but the results will be rewarding.
Lighting Setup
After you have purchased the basic equipment for high key photography, you need to set up your studio environment. There are many ways to obtain a stunning high key image. We’ll cover the most popular method of achieving this effect in photography, and you can experiment on your own once you’ve learned the basic setup.
You should position your subject (model or product) in the center of the backdrop and keep the shot’s frame within the bounds of the backdrop. No gaps should be visible since they will affect the exposure! After you have positioned your subject correctly, you should place a key light and fill light. The key light should be off to one side, and it should be your main source of light. You have to make sure the lighting is flat because you’re not going for contrast in this kind of setup – you should focus on brightness!
Having the key light on one side will produce shadows on the opposite side of the subject – that’s why you need to use a fill light to smooth out the shadows. You can then reduce the darkness of shadows as much as possible by adjusting the strength of the key light and the fill light and the distance between them.
In case you have only two lights available, they will produce a greyish, shadow-filled background. You need 3 or 4 lights for high key photography since you want to have a solid white background without any shadows. Bring an additional two lights and point them at your backdrop to eliminate shadows. Make sure the light isn’t bouncing off your backdrop (angle the lights properly!) because this can cause unsightly halos around the subject.
 High key studio setup
Техники выполнения
Оптическая при съёмке
Основными составляющими для съёмки в высоком ключе являются , главный объект съёмки, фон и настройки камеры.

Использование отражателя при съёмке в высоком ключе
играет значительную роль — требуется равномерная проработка объекта съёмки . Этого можно достичь за счёт съёмки в пасмурный день или с . Используется также отражатель с белой поверхностью на просвет или на отражение, который позволит избежать искажений цветовой температуры благодаря тому, что часть объекта, освещенная солнцем, будет иметь одинаковый оттенок цвета, что и часть объекта, освещенная отражателем. Контраст светотени должен быть предельно низким.
Главный объект съёмки должен быть неконтрастным и иметь светлые тона. Высокий ключ часто применяют в жанре . В таком случае желательно, чтобы фотографируемая имела определенные внешние данные: светлые , светлый оттенок , светлую .
Фон по яркости должен быть таким же или более ярким, чем объект съёмки. В качестве фона может применяться белого цвета (без стыков) или светлая .
Настройки камеры являются четвёртой составляющей при съёмке в высоком ключе. Необхожимо сделать на несколько ступеней ярче за счёт увеличения , значения или открытия . При этом для удобства в камере, оснащённой функцией контрастной фокусировки, можно включить отображение в режиме .
Возможные ошибки
- недостаточная яркость освещения
- объект съёмки расположен близко к фону, что приводит к отбрасыванию тени
- неправильные настройки экспозиции
Цифровая коррекция

Исходный снимок. Женский , сделанный на 28-70 мм. f2.8D ED-IF AF-S

Снимок, отредактированный в программе
Использование компьютерных программ — позволяет изменять тональность снимков уже после того, как они были сохранены в файл.
Многие программы (например, и ) имеют специальные средства, предназначенные для коррекции экспозии как в целом изображения, так и отдельных участков. Во время редактирования снимка можно пользоваться . Для создания соответствующего эффекта изображение может быть обесцвечено.
Коррекция тональности снимка возможна при оптической с в фотолаборатории.
Lighting Equipment For High Key Photography
Your choice of lighting equipment will depend on whether you plan to shoot your high key session indoors or outdoors. Majority of high key sessions are shot indoors because it’s easier to control and modify the light in the studio than somewhere outdoors.
However, you should know that shooting indoors in high key is not easy if you don’t have the proper equipment. If you need to achieve “the studio look” with a seamless white background and soft lighting, you’ll need to invest in studio lighting. Getting started with this kind of lighting can be quite expensive. However, there are many choices since you don’t have to buy the equipment from the most prestigious brands. Various starter kits are available from a range of brands – depending on the quality of the equipment, you can expect to spend between $200 and $2000.

You have two main options when it comes to the type of lighting for high key photography – you’ll need either continuous lighting or strobes. When it comes to continuous lighting, you can use tungsten or fluorescent lights. Tungsten lights will produce warmer looking scene while fluorescent lights will give relatively cool results. Which light to pick is a matter of personal taste, but in case you plan to shoot mainly portraits, it might be better to go for the warmer one.The problem with continuous lights is that they tend to be low-powered (unless you buy the top quality ones). This can make it difficult to pull off excellent high key photography. Strobes are more powerful and a better choice if you can afford them.
In addition to lights, you will need a few more items for your high key photography, such as light modifiers and backdrop.
To sum it up, here’s the list of things you’ll need for a high key setup in the studio:
- Three or more continuous lights or strobes
- optional: 3 umbrellas (to use with fill light and background lights)
- optional: 1 large softbox (to use with key light)
- simple backdrop
- radio triggers (in case you’re using strobes these trigger the lights by radio signal)

Camera Settings
When it comes to camera settings for high key photography, they are pretty straightforward. It shouldn’t be hard to get them right, even if you’re an amateur photographer.
It can be really useful to have a lens with a wide aperture if you plan to shoot high key images. These lenses let in more light compared to kit lenses. An excellent choice would be a 50mm prime lens – these are available in f/1.8 and f/1.4 versions.
Start with a low ISO (between 50 and 200) in a bright environment with an aperture that’s wide enough to give you a really bright scene. However, you should feel free to use a narrow aperture (such as f/11) if you’re not aiming for a blurry background.
When it comes to exposure, you should lengthen it to brighten the scene as much as possible without blowing out the highlights (high key doesn’t mean badly exposed!) or causing blur from camera shake, or model movement. To prevent blur from camera shake, use a tripod.
A rule of thumb is to set your shutter speed so that the image is overexposed by a few stops (usually 2 or 3). It’s safe to start with overexposing your image by two stops. Once you’ve done it, analyze the image and shoot again if you aren’t satisfied with the results. You can also shoot in aperture priority and use exposure compensation to bump up the exposure.

What Is High Key Photography
If you don’t know what high key photography is, we’ll make sure to explain it thoroughly. This type of photography uses very bright lighting to blow out most of the harsh shadows in a photograph. High key photography has an interesting history – it was originally developed as a solution to screens that couldn’t correctly display high contrast ratios. It is well-known that early film and television did not deal well with these high contrast ratios. However, over time, high key photography has become a stylistic choice rather than a solution to faulty screens.
High key images, because of their brightness, convey a positive or serene mood which is great for fashion and product photography, flowers and similar subjects that are either feminine or delicate.
High key lighting was quite popular in classical Hollywood cinema because it was well suited for three-point lighting and other filmmaking traditions. It was used for both daylight and night scenes.