Объективы для камер Nikon DX AF-S Nikkor 18-135 mm 13.5-5.6G DG и МС МИР-24 Н 235
Содержание
Sharpness at Infinity
Just as in the test chart range, the optimum aperture at infinity is f/11. It is worth noting when using long focal lengths, atmospheric conditions usually are a larger thief of sharpness than aperture ever is:

Infinity sharpness was confirmed with this boring and ill-composed shot of the local clock tower
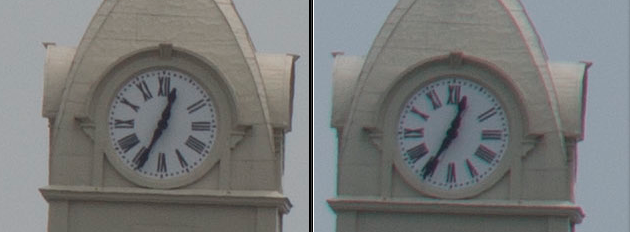
Here at 100% the optimum f/11 aperture is confirmed in the center (left image) and corners (right image). Though there is a bit of contrast difference (the corners never do get as great as the center), the sharpness is the same. Also, don’t ask what happened to the “I”. Your guess is as good as mine.
Pros
- Super compact, lightweight, and at an affordable price
- Great build quality (almost as good as the AI-s Nikkors) with only a slight amount of plastic construction. Overall operation is superb.
- Tack-sharp performance in the center when stopped down at all focusing distances, but is completely useable at the larger apertures (see cons). Corner performance is consistently good.
- Very smooth background bokeh at all apertures, smooth foreground bokeh starting at f/5.6.
- Out-of-focus highlights are generally clean and non-distracting from f/2.8-5.6
- Purple fringing is all but gone by f/4
- Flare is a non-issue with only one small blob in a few instances
- Negligible vignetting
- Negligible distortion
- The 135mm f/2.8 E is much smaller, lighter, and cheaper than ANY 80-200 f/2.8 zoom, and probably has less distortion and more light transmission (fewer elements for light to pass through)
Cons
- Wide-open, contrast is lacking in the center, while the corners are lacking in both sharpness and contrast. Stopped down to f/32, image-level degradation may become noticeable.
- Optimum aperture is at f/11. Though this allows for a greater working range, those that may prefer optimum performance at hand-holdable shutter speeds may be disappointed. There are zooms that have their optimum at f/8, for comparison, and some great primes, such as the 180mm f/2.8 AI-s ED, peak at f/5.6.
- Foreground bokeh is busy and distracting from f/2.8-4
- Purple fringing wide-open in high contrast scenarios is very bad, though is mostly correctable. In normal situations it is nothing to worry about and is completely correctable for critical work.
- Longitudinal chromatic aberrations are very pronounced and distracting, both in the background green hue and in the foreground purple hue. These are generally possible to edit out, but in some situations can prove to be difficult to correct.
- Manual focus only, in case you had forgotten
The Bottom Line
I have some major praise and some reservations on this lens. There is no set-in-stone recommendation I can give out. Let me put it this way: if you are wanting a compact fast telephoto (APS-C) or a super-telephoto (m4/3) for your camera that performs well in generally all situations at a bargain price, the 135mm f/2.8 E should be on your short-list. If you are like me, and are wanting a faster telephoto with greater depth of field control and a larger optimum aperture for hand-holdable shutter speeds at peak performance, then you may want to reconsider the 135mm f/2 AI-s (which is much, MUCH more expensive than the 135mm f/2.8 E or AI-s). That said, I am going to hold onto this lens for the situations when I need a bit more reach and a lighter kit than my 105mm f/1.8 AI-s. Though I would love to shoot with the 135mm f/2 AI-s, I’m not sure it would see as much use–it is over two times as heavy as the Series-E 135mm, weighing in at 30.2 ounces/855 grams!
Here are some various sample shots taken with this lens and the NEX-7 over the past couple weeks to finish this review up:

Hydrant135mm, ISO 100, f/4, 1/320

Maximum Contrast135mm, ISO 100, f/4, 1/500
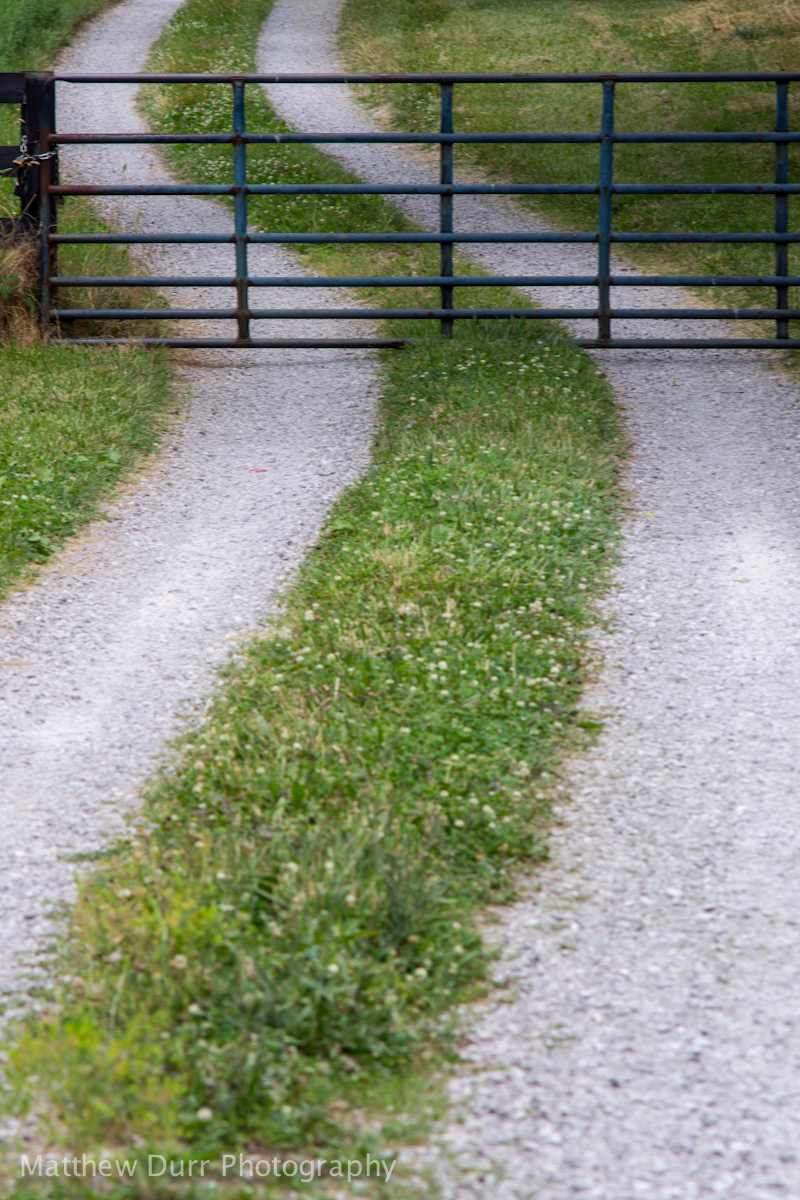
The Winding Road135mm, ISO 100, f/5.6, 1/160
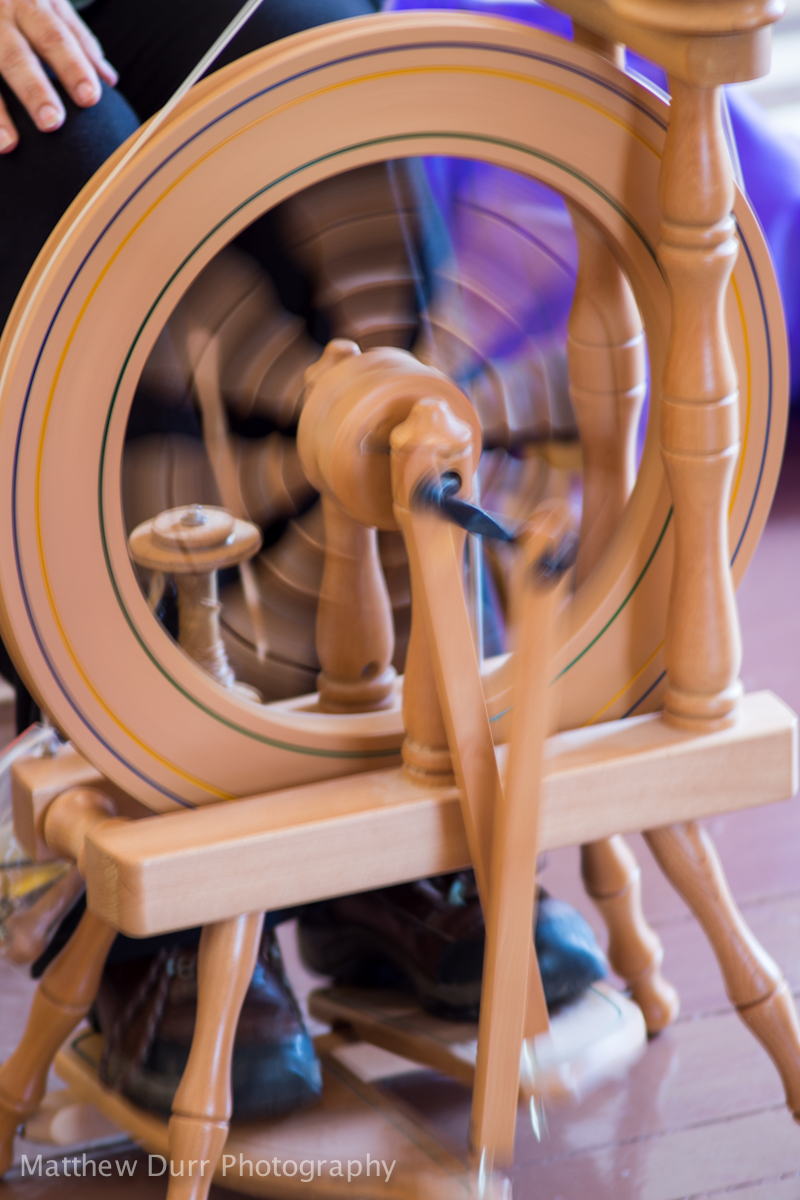
Spinner135mm, ISO 100, f/2.8, 1/10 (handheld!)

Gas Line135mm, ISO 100, f/2.8, 1/1250

Grinning On135mm, ISO 1600, f/2.8, 1/200
And hey, look at me, I managed to keep flower shots out of this one. Anyways, hope you all liked this review, comments and criticisms welcome, as always. With that, have a great one guys.
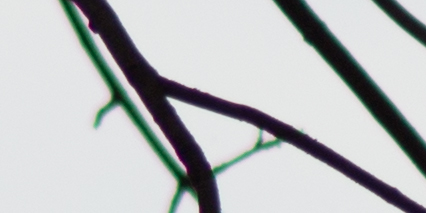
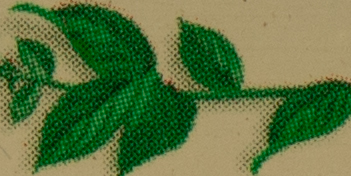
Purple Fringing
A form of chromatic abberation (a type of distortion where certain colors do not hit the image sensor at the same convergence point), purple fringing is typically seen in fast lenses at their wider apertures when shooting scenes of contrast, such as branches against sky. Though purple fringing can be cleaned up very well in post processing nowadays (see my detailed post on that here), it is still an important point to take in consideration if one either doesn’t have the time to post process, or has purple objects in the frame that does not want to be desaturated. To assess purple fringing, I used this scene:

This set-up is the absolute worst-case scenario for purple-fringing. Here maximum contrast has been achieved, as the branches are in the shade (clipping to black), while the overall image is overexposed by 1.7 stops in each image (clipping the whites).
f/2.8–Very bad purple fringing that takes up the entire branch (that is in focus, anyway)
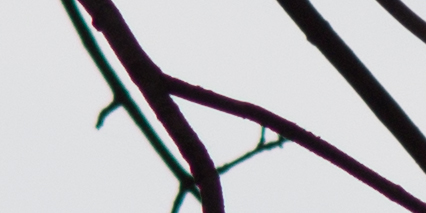
f/4–Leaps and bounds better than wide open. Purple fringing is almost completely absent and only slightly visible viewing the individual pixels at 400%.
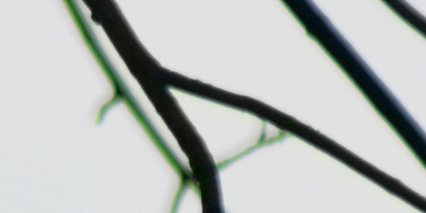
f/5.6–Absolutely no purple fringing.
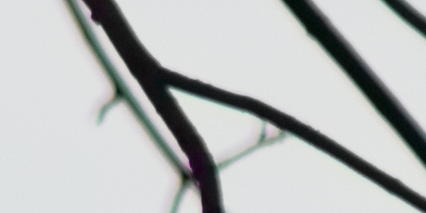
Using Lightroom 4’s excellent de-fringing sliders, even f/2.8 can look just fine after 15 seconds of editing:
f/2.8–Purple Fringing removed with a “14” value correction
I must mention in normal shooting situations, purple fringing even wide-open isn’t a real problem with this lens. Don’t shoot tree branches wide-open, and you’ll be just fine.
Flare
One of the cost-cutting measures for the Series-E lenses was to only single-coat the lenses. Lenses that are single-coated tend to not have very good flare control due to many internal lens reflections. Nikon eventually started to give multi-coating to the later Series-E’s, which helped control flare much better than any single-coating ever could. Based off my time with the lens, I believe my copy of the 135mm f/2.8 E may actually be multi-coated. Flare performance is very good. The following images were taken at f/32 to keep from too much overexposure. I also took two series of shots, one with the built-in hood retracted, the other with it extended. I expected to see at least a little difference in flare control depending on the hood position, but no dice. Both sets were identical in performance. This leads me to guess that the hood may only protect from point light sources shining directly onto the front element at an extreme angle–other than that there’s no reason to extend it except to get a little more contrast. WARNING! With the NEX-7 and its EVF, I don’t have to worry about shooting into very bright sources of light. If you attempt to do these shots on a DSLR, you’ll go blind before you see any evidence of flare!

With the sun just out of the frame, there is only a small and non-distracting blue-ish blob in the upper right.

As the sun enters the frame, the small and blue blob is still the only artifact of flare.

As the sun nears the center of the frame, there still are no harsh internal reflections visible. Surely this lens is multicoated! Contrast is very good as well, the trees are still inky black, indicating there is no worry with veiling flare on the 135mm.
With these shots and my own personal experience in mind, flare is not a problem at all with this lens. Shoot around bright sources of light all day long, with the hood positioned wherever you like.
Longitudinal Chromatic Aberration
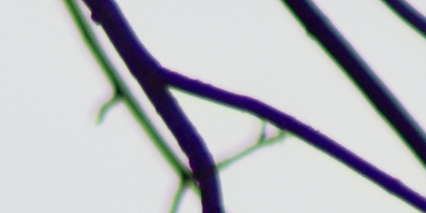
Longitudinal Chromatic Aberration (also known as “bokeh fringing”) is another form of aberration that is mainly prevalent on large aperture lenses in areas that are out-of-focus (hence the bokeh designation). A lens that suffers from LoCA has objects in the background tinged with green, while objects in the foreground are tinged with purple. Stopping down a lens only marginally helps in reducing LoCA’s, all stopping down really does in most instances is bring more objects into focus (anything out of focus will still have the aberration). Usually the purple hue on foreground objects is of a different hue than purple fringing, so foreground LoCA can be very difficult to remove in post-processing. Fortunately, Lightroom 4 also has a dedicated aberration slider for the green hue, so background LoCA’s can be removed easily. If you take a look again at the “fixed” image for purple fringing in the last point, you can see very easily that the branch to the far right has purple LoCA, while the branch to the immediate left has heavy green LoCA. Here is a minute’s worth attempt at fixing these aberrations:
To fix the purple LoCA while keeping the purple fringing fix from the previous image intact, the hue had to be adjusted and expanded, so if any purple objects were in the frame, they would probably be heavily desaturated (bad). For the green LoCA, a small “4” value addition with a slight change to the hue adjustment removed the aberration well. After all this work, however, there is still some grey haziness left over from the removal that cannot be edited out, but at least the discoloration is gone from the image.
A real-world example of how distracting the green LoCA’s can be:

Click for full-size of this heavily cropped shot at f/2.8. After the jump, notice how weird and distracting the grass behind the robin looks. I really can’t figure out how to get these hues edited out after a considerable amount of time with the chromatic aberration sliders in LR 4.
Sharpness at Macro
As mentioned, the 135mm f/2.8 E is NOT a macro lens. Even when used on a cropped APS-C sensor, the focusing distance is too long. When shot on a m4/3 camera, one can get a little “closer” due to the increase in FOV length, though the focusing distance remains the same. If you so choose to shoot at close-focus often, and desire optimum pixel-level sharpness, f/8 is the best aperture:

As close as you can get
100% crop from the previous image at f/8. Detail is very sharp and contrasty, allowing for a lot of “cropability”, if needed. When stopped down to f/11 (the optimum aperture at other focus distances), the image is slightly softened due to diffraction)
And now for a “real-world” example of the close-focus distance:

The Super-Dandelion135mm, ISO 100, f/4, 1/1000For a sense of scale, this field weed is about the size of a small fist, much larger than typical lawn dandelions.
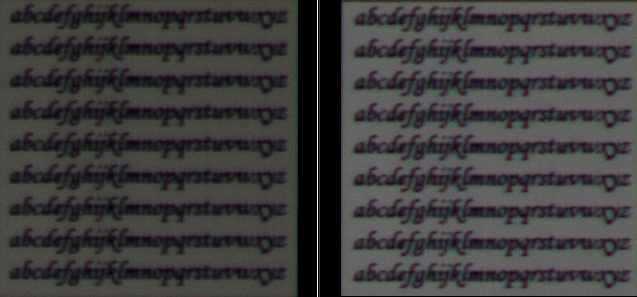
Sharpness
Though sharpness is supposed to be only a small component in a lens’ performance, many feel it is the deciding factor between a good or bad optic. I personally fall somewhere in the middle. I love seeing pixel-level sharpness (especially with a 24MP sensor), but it isn’t terribly important that all my shots are sharp when viewing at 100% on screen. With that in mind, I have tested the 135mm f/2.8 E to find a very strange characteristic in its performance of sharpness. The lens starts pretty sharp, and eventually gets very, very sharp. The only problem is it takes a lot of stopping down to get to the optimum aperture.

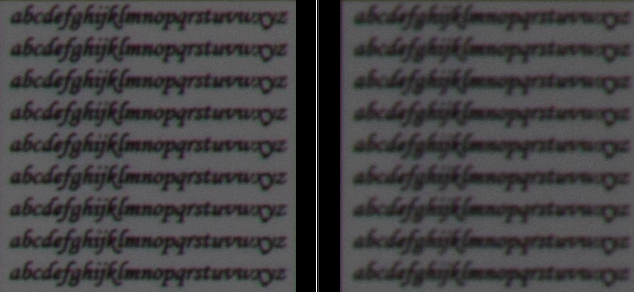
Sharpness is assessed with this free chart downloadable at the link at the top of the picture. The file is about 19MP, printing at 300 dpi at 12×18 inches. However, the prints I have tried making at this size come out fuzzy. For these tests, the chart has been printed in the 8×12 size, with the dpi well over what is needed for lens testing. Focusing distance is about 12 feet.
Let’s start out with some simple center crops by aperture:

f/2.8

f/4

f/5.6

f/8

f/11

f/16

f/22

f/32
Starting out wide-open, a lot of detail is still visible, though contrast is rather low. With regards to sharpness, f/4-8 look about the same, with contrast improving a bit at each stop. Center sharpness and contrast peak at f/11, where overall detail is excellent. At f/16 diffraction begins, and by f/32, the image is heavily softened due to this effect. For critical work, stay in the aperture range of f/8-16. Wider apertures should only be used in cases where depth of field or shutter speed are the priority. For the smaller apertures, reserve use for longer exposures or for greater depth of field. However, don’t hesitate to shoot from f/2.8-5.6, as contrast can always be helped out (if needed) in post-processing, and sharpness never makes a good photograph.
Moving on to corner crops by aperture…
Left: f/2.8 Right: f/4
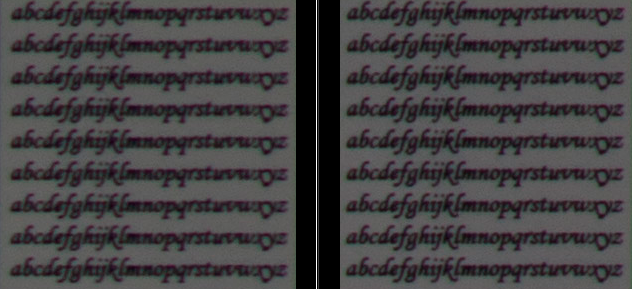
Left: f/5.6 Right: f/8
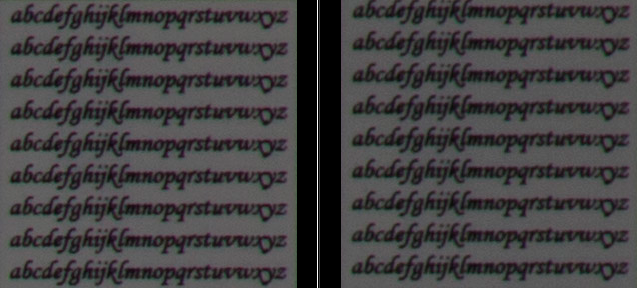
Left: f/11 Right: f/16
Left: f/22 Right: f/32
Thanks to the “sweet spot” advantage of using full-frame designed lenses on smaller sensors (this case APS-C), the corners on the 135mm f/2.8 E do very well. Detail wide-open isn’t very clear due to low-contrast and some vignetting, but is acceptable. More detail is visibly seen at f/4, but contrast is still low. In this case, both sharpness and contrast improve at every f-stop following, but the optimum is yet again at f/11. Blown up to 400%, diffraction slightly dulls detail at f/16, and by f/32 the corners have lost detail and contrast due to the effect. As above, contrast can always be addressed in post-processing, but as far as critical detail in the corners, the best apertures are about the same as the centers, f/8-16. In real photographs, pixel-level sharpness in the corners doesn’t particularly matter anyway, so feel free to shoot at whatever aperture you need to get the shot (though, admittedly, degradation at the image level may become apparent at f/32). Since the corners in most shots are out of focus anyway at the larger apertures, the lack of corner detail is a non-issue:

The Artist135mm, ISO 100, f/2.8, 1/100 (handheld!)Pixel-level sharpness makes better photographs. Yeah. Sure.
Some may be disappointed that the 135mm f/2.8 E peaks in performance at f/11, rather than something like f/5.6 (such as the 180mm f/2.8 AI-s ED). There are some zooms that peak at f/8! The good news in all of this is the images start out pretty sharp wide-open, but only improve from there. This means that the 135mm becomes a more versatile lens in more shooting situations, as detail remains good in a larger aperture range. There is no harsh drop off in image quality at most apertures (save for the lack of contrast wide-open and the diffraction-affected f/32), and the steps to get to peak performance are small and graduated.
Bokeh
“Bokeh” is an artistic term of Japanese origin for the character of anything in the image that is not in focus. Typically, smooth bokeh, where out of focus objects and highlights seem to “melt” into the background, is favorable. In regards to the 135mm f/2.8 E, bokeh is very good to excellent depending on what is in the background.

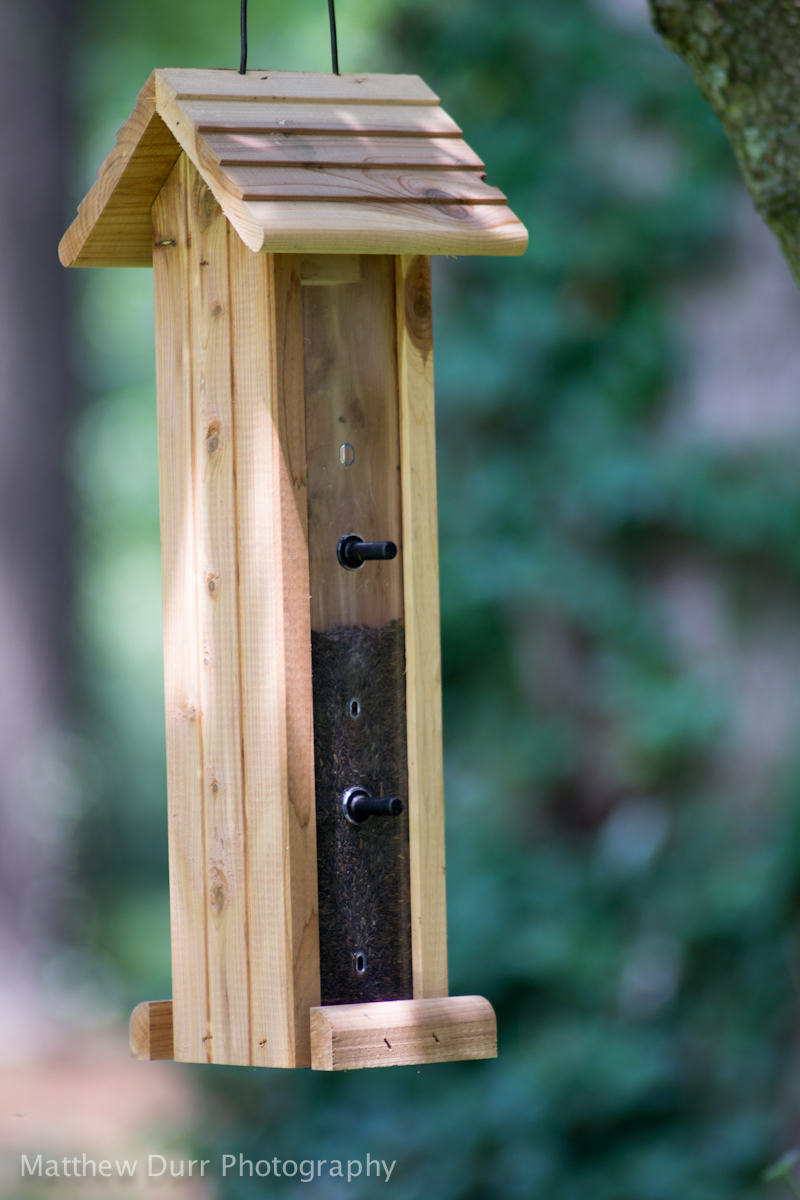
In this shot, taken at f/32 for maximum depth of field, bokeh smoothness will be assessed. The Altoids box is the focus point, while the small russian figurines are staggered in front of and behind the box.
By aperture (these are NOT 100% crops):

f/2.8

f/4

f/5.6

f/8, by f/11 everything starts to get into relative focus
As far as bokeh smoothness goes, the 135mm f/2.8 E displays smooth and un-distracting backgrounds at all larger apertures. Foreground bokeh is a mixed bag. At f/2.8-4, there is noticeable business and doubling that can be distracting. Once stopped down to f/5.6-8, foreground bokeh is decently smooth, an odd but welcome characteristic.
Glass Half-Full135mm, ISO 100, f/2.8, 1/160In this real-world shot, background bokeh is pretty smooth throughout the frame. It seems as though this lens suffers from a bit of “swirly” bokeh, where the background seems to swirl in a circular motion. I don’t consider this a pro or con, as it all depends on personal taste.
Now let’s look at how this lens handles out of focus highlights, by aperture. The following are NOT 100% crops from the highlights from the decorative item in the macro set-up:
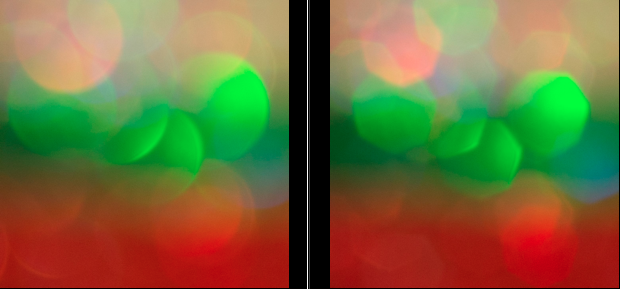
Left: f/2.8 Right: f/4
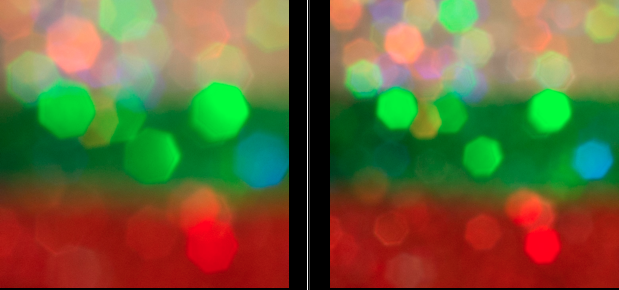
Left: f/5.6 Right: f/8
f/11, by f/16 highlights begin to turn into point sources of light
Another welcome surprise, the 135mm f/2.8 E handles out-of-focus highlights very well. From f/2.8-4, there are no rings around the highlights, and they remain a very solid color (the aperture shape begins to show at f/4). At f/5.6, it is almost as good, but rings start to appear on most point sources of light. At f/8-11, the rings aren’t as noticeable, but many of the highlights begin to get distracting artifacts in the highlight. That said, these artifacts will only be noticeable when printing very big (and in critical situations, even the harshest highlights can be fixed in Photoshop). I would still personally prefer to stay in the f/2.8-5.6 range if there were many highlights in a picture.